PowerShell is proving to be a wonderful tool for Microsoft System Admins. The ability to send emails in a PowerShell script can be quite useful, you can use this simple little function to send an email from PowerShell.
You could potentially use this function to send you an email when an automatic PowerShell task runs and fails or if you want to notify yourself of something during the script.
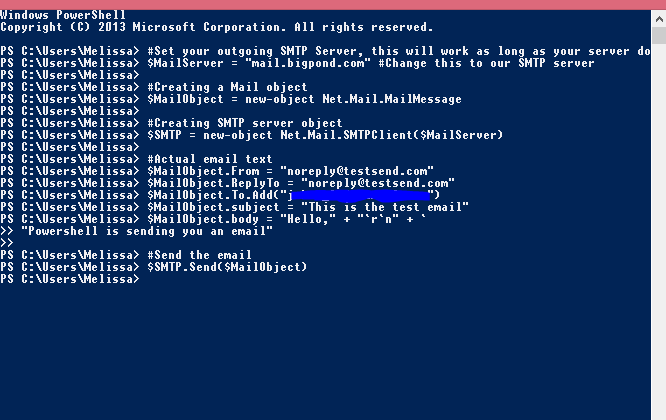
The results of my test are below the PowerShell code. Function SendMail{
#Set your outgoing SMTP Server, this will work as long as your server does not need authentication
$MailServer = "mail.bigpond.com" #Change this to our SMTP server
#Creating a Mail object
$MailObject = new-object Net.Mail.MailMessage
#Creating SMTP server object
$SMTP = new-object Net.Mail.SMTPClient($MailServer)
#Actual email text
$MailObject.From = "[email protected]"
$MailObject.ReplyTo = "[email protected]"
$MailObject.To.Add("[email protected]")
$MailObject.subject = "This is the test email"
$MailObject.body = "Hello," + "`r`n" + `
"Powershell is sending you an email"
#Send the email
$SMTP.Send($MailObject)
}
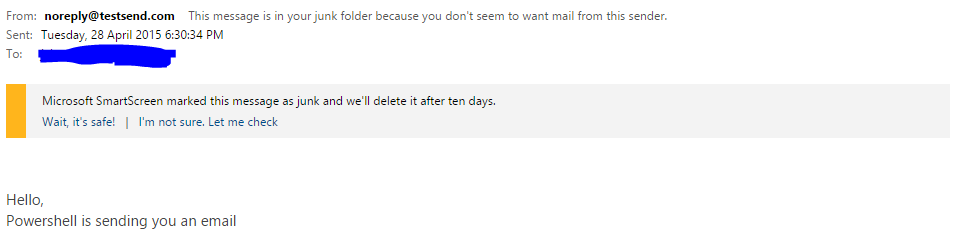
Email received from my test sending with PowerShell, it got filtered into spam but it worked!!Read More →
NDR stands for non-delivery report. When an email is rejected from an email server you may receive an NDR email, this usually happens because you have sent the email to an email address that does not exist.
This list of NDR codes and what they mean may help you for diagnosing your email issues, or issues with your exchange or Linux based email servers.
4.2.2 The recipient has exceeded their mailbox limit. It could also be that the delivery directory on the Virtual server has exceeded its limit. (Default 22 MB) 4.3.1 Not enough disk space on the delivery server. Microsoft say this NDR maybe reported as out-of-memory error. 4.3.2 Classic temporary problem, the Administrator has frozen the queue. 4.4.1 Intermittent network connection. The server has not yet responded. Classic temporary problem. If it persists, you will also a 5.4.x status code error. 4.4.2 The server started to deliver the message but then the connection was broken. 4.4.6 Too many hops. Most likely, the message is looping. 4.4.7 Problem with a timeout. Check receiving server connectors.
4.4.9 A DNS problem. Check your smart host setting on the SMTP connector. For example, check correct SMTP format. Also, use square brackets in the IP address [197.89.1.4] You can get this same NDR error if you have been deleting routing groups. 4.6.5 Multi-language situation. Your server does not have the correct language code page installed. 5.0.0 SMTP 500 reply code means an unrecognised command. You get this NDR when you make a typing mistake when you manually try to send email via telnet.
More likely, a routing group error, no routing connector, or no suitable address space in the connector. (Try adding * in the address space)
This status code is a general error message in Exchange 2000. In fact Microsoft introduced a service pack to make sure now get a more specific code. 5.1.x Problem with email address. 5.1.0 Often seen with contacts. Check the recipient address. 5.1.1 Another problem with the recipient address. Possibly the user was moved to another server in Active Directory. Maybe an Outlook client replied to a message while offline. 5.1.3 Another problem with contacts. Address field maybe empty. Check the address information. 5.1.4 Two objects have the same address, which confuses the categorizer. 5.1.5 Destination mailbox address invalid. 5.1.6 Problem with homeMDB or msExchHomeServerName – check how many users are affected. Sometimes running RUS (Recipient Update Service) cures this problem. Mailbox may have moved. 5.1.7 Problem with senders mail attribute, check properties sheet in ADUC. 5.2.x NDR caused by a problem with the large size of the email. 5.2.1 The message is too large. Else it could be a permissions problem. Check the recipient’s mailbox. 5.2.2 Sadly, the recipient has exceeded their mailbox limit. 5.2.3 Recipient cannot receive messages this big. Server or connector limit exceeded. 5.2.4 Most likely, a distribution list or group is trying to send an email. Check where the expansion server is situated. 5.3.0 Problem with MTA, maybe someone has been editing the registry to disable the MTA / Store driver. 5.3.1 Mail system full. Possibly a Standard edition of Exchange reached the 16 GB limit. 5.3.2 System not accepting network messages. Look outside Exchange for a connectivity problem. 5.3.3 Remote server has insufficient disk space to hold email. Check SMTP log. 5.3.4 Message too big. Check limits, System Policy, connector, virtual server. 5.3.5 Multiple Virtual Servers are using the same IP address and port. See Microsoft TechNet article: 321721 Sharing SMTP. Email probably looping. 5.4.0 DNS Problem. Check the Smart host, or check your DNS. It means that there is no DNS server that can resolve this email address. Could be Virtual Server SMTP address. 5.4.1 No answer from host. Not Exchange’s fault check connections. 5.4.2 Bad connection. 5.4.3 Routing server failure. No available route. 5.4.4 Cannot find the next hop, check the Routing Group Connector. Perhaps you have Exchange servers in different Routing Groups, but no connector. 5.4.6 Tricky looping problem, a contact has the same email address as an Active Directory user. One user is probably using an Alternate Recipient with the same email address as a contact. 5.4.7 Delivery time-out. Message is taking too long to be delivered. 5.4.8 Microsoft advise, check your recipient policy. SMTP address should be cp.com.
NOT server.cp.com. 5.5.0 Underlying SMTP 500 error. Our server tried ehlo, the recipient’s server did not understand and returned a 550 or 500 error. Set up SMTP logging. 5.5.2 Possibly the disk holding the operating system is full. Or could be a syntax error if you are executing SMTP from a telnet shell. 5.5.3 More than 5,000 recipients. Check the Global Settings, Message Delivery properties. 5.5.5 Wrong protocol version 5.6.3 More than 250 attachments. 5.7.1 Permissions problem. For some reason the sender is not allowed to email this account. Perhaps an anonymous user is trying to send mail to a distribution list.
Check SMTP Virtual Server Access Tab. Try checking this box: Allow computers which successfully authenticate to relay
User may have a manually created email address that does not match a System Policy. 5.7.2 Distribution list cannot expand and so is unable to deliver its messages. 5.7.3 Check external IP address of ISA server. Make sure it matches the SMTP publishing rule. 5.7.4 Extra security features not supported. Check delivery server settings 5.7.5 Cryptographic failure. Try a plain message with encryption. 5.7.6 Certificate problem, encryption level maybe to high. 5.7.7 Message integrity problem.
The first way to update Windows 10 is to open the control panel, then select Windows Update. Then check for updates and install them.
The second option is to open the Windows Update app. To open Windows Update app just type in update in the start menu then select Windows Update. Then download and install the updates.
With Windows 8 and 8.1 computers some of them have been coming out with BIOS embedded product keys. This has done away with the stickers that had the product key on them stuck to the bottom of laptops and stuck on the side of desktops.
Activating these when you install from traditional windows installation media(cd, USB, etc) is quite easy just install windows, connect to the Internet and its activated automatically. No more needing to type out that pesky mix of numbers and letters that make up your Windows product key.
This means no more of the product key stickers that can get damaged meaning that when you install your operating system you do not need the product key sticker to activate Windows. This would seem like an excellent idea, except that it was not designed for people that use MDT(Microsoft Deployment Toolkit) to deploy Windows images to their computers, THEY JUST DON’T ACTIVATE!!
If you use MDT to deploy your images I’m sure you have ran into this frustrating problem as well. Apparently Microsoft thinks that MDT is only used by organisations that have volume licensing agreements and do not use computers with BIOS embedded product keys.
How to activate Windows embedded BIOS key after MDT installation
The way to actually activate Windows 8 or Windows 8.1 BIOS embedded product key is to extract it out of the BIOS and then manually enter it into the operating system.
So the steps are:
Deploy your image as you would normally using MDT
Extract Product Key from BIOS
Go to “Activate My PC”
Enter the product key that you extracted earlier from your BIOS
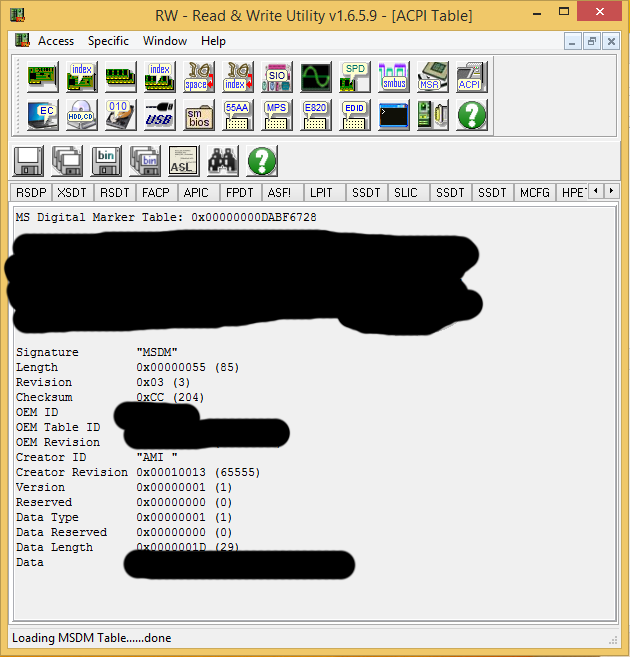
How to extract product key from BIOS
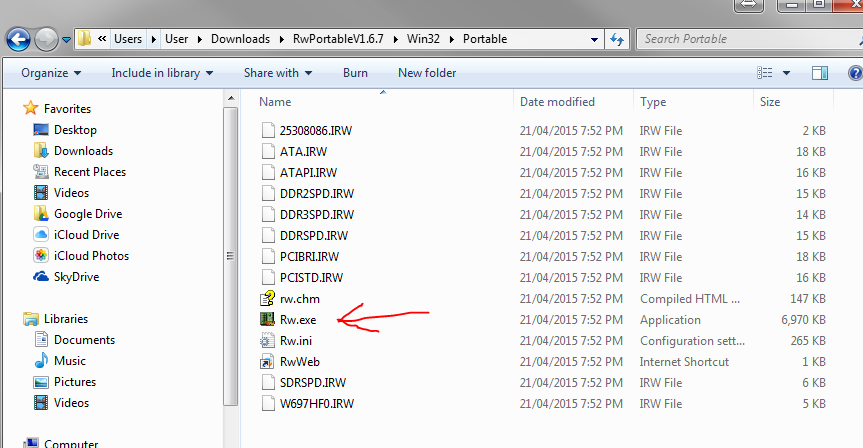
The tool that you will need to extract the Windows product key from BIOS is RW-Everything.
First you will need to download RW-Everything(I like the portable version, just saves you having to install anything)
Once it is finished downloading extract the .Zip file and navigate to the Rw.exe file
Then you will need to run Rw.exe as administrator
Click the ACPI button at the top and then go MSDM tab
Under “DATA” will be the embedded product key
If you look under the DATA line will be the BIOS embedded product key.
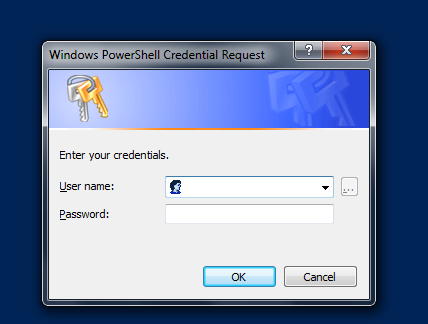
I use these commands to connect to Exchange Online in Office365.
To do this you need to open powershell and run these command:
$LiveCred = Get-Credential

$Session = New-PSSession -ConfigurationName Microsoft.Exchange-ConnectionUri https://ps.outlook.com/powershell -Credential $LiveCred -Authentication Basic -AllowRedirection

Import-PSSession $Session
After the first line it will pop up and ask you for credentials for Office 365. You will need to use your administrator email and password.
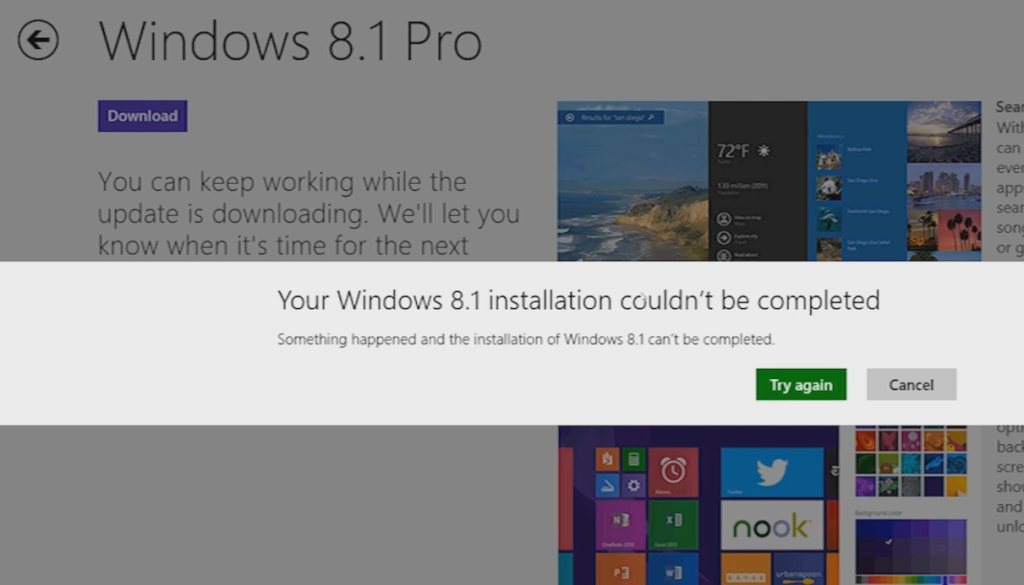
This error happens when trying to upgrade Windows 8 to Windows 8.1 through the Microsoft Store.
If you get this error what you need to do is install all of your Windows updates and then try the upgrade to Windows 8.1 again.
You can upgrade Windows 8 to Windows 8.1 for free through the Microsoft Store, I would recommend you do this because then you will have the latest operating system.
To do this you need to:
Open the start menu and type in “update”
Click on the “settings” button
Select “Install Optional Updates”
Select check for updates on the left of the Windows Update pane
Secure boot and UEFI BIOS is something that has been introduced with windows 8 and 8.1. Secure boot stops you from accessing the hard drive when booting to CD or USB and therefore stops you using traditional tools to reset your windows password.
To bypass this you need to remove your hard drive and connect it to another computer. I use a USB dock to do this, using a USB docking station allows you direct access to hard drives and gives you plug and play functionality.
You will need a computer with Linux installed, preferably Kali Linux as this comes the the packages pre installed. If you are using a different distro(if you are not sure what a distro is have a look at our Introduction to Linux)
I have used a Virtual Machine and attached the hard drive to it and then booted to Kali Linux.
Once you have booted up the Linux VM you will need to open a terminal.
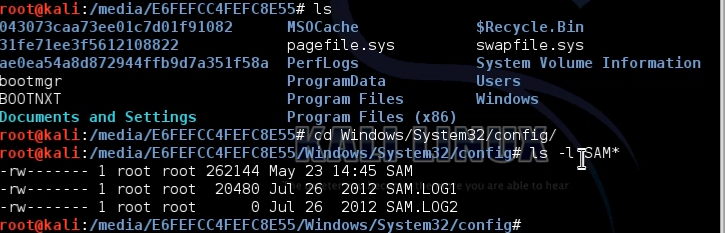
Then navigate to the Media folder by typing the command:
cd /Media
Then run the ls command to see what drives you have attached. Identify which drive has is your windows c: drive.
Change the working directory to the c:/windows/system32/config by running the command:
cd Windows/System32/config
Once in the directory you will need to make sure that the SAM database is in this folder. To do that run the command:
ls -l SAM*
You should see the SAM database I that directory.
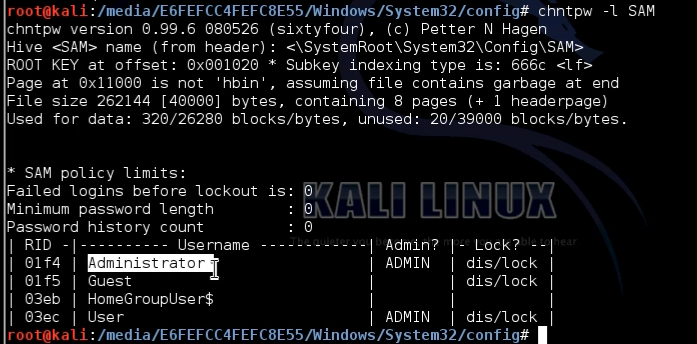
Now you will need to view what users are in the SAM database you do that by running the command:
You will see a list of users that are currently created in the SAM database
chntpw -l SAM
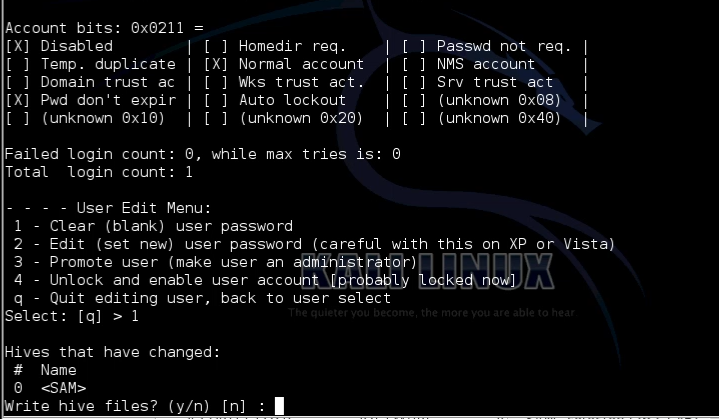
Now you want to reset the password for the Administrator user and also enable the user by running the command
chntpw -u Administrator SAM
Then select option 1 to clear the password
Run the command again
chntpw – Administrator SAM
and select option 4 to enable the account
Now install the hard drive in the original computer and boot to Windows. If you had secure boot on your computer you will need to make sure that it is still enabled in BIOS.
You should now be able to log in as the built in Administrator account, then you just need to reset the original user accounts password.
To do this open run a command prompt as administrator and type the command(make sure to replace <username> with your username:
net user <username> *
Reset the users password
Now log out of the administrator user and log in as your user, using the password that you have just set.
Now run a command prompt as administrator and type the command:
net user administrator /active:no
Says that the command has worked successfully and the administrator user is no longer active
RDP or Remote Desktop Protocol is used to get a remote session into a Windows or Windows Server operating system. This unlike other tools like telnet gives you a graphical session to your remote computer, this means you can log in and get your normal Windows desktop environment.
Microsoft have released official Remote Desktop applications on the following platforms:
Mac OSX
Andoid
iOS
Windows phone
This means that you can work remotely from your mobile devices and also other platforms. While there is no official RDP application for Linux there are third party applications that will allow you to use the RDP protocol from Linux.
You can only use remote desktop to remote access Windows Pro or Windows Server products. Windows Home editions will not allow remote desktop access. You can remote from Windows Home editions into Professional editions though.
Why is Remote Desktop used
Remote Desktop is commonly used to administer Windows Servers and also in a terminal server(now called Remote Desktop Services) environment. Because the RDP application is built into server by default it is easy to set up and does not need any extra software installed on the server.
RDP security concerns
The Remote Desktop Protocol does come with some security issues. If you use RDP from an unsecured network(like free WiFi in cafe) or somebody gains access to your network the traffic can be sniffed and compromised.
It is best practice to use a VPN to connect to the local network from an outside network to encrypt the traffic, this will increase the security of your RDP connection.
Alternatives to RDP
Sometimes you will not be able to use RDP to connect to Windows computers, this could be because you just want to log into the computer once and you cannot get a firewall rule configured or because you want the end user to see what you are doing. These programs do not come included in Windows, some popular examples of these are:
Teamviewer
Team viewer has a free version if you are using it for non-commercial usage. Teamviewer works by running the teamviewer program on both computers. If you are using it in a business environment than you need to pay for a licence. With teamviewer people on both sides will be able to see what is being done.
Logmein
With Logmein you install the application on a PC and then access it through a web portal. Logmein does not have a free version if you want to use it then you will need to pay.
UltraVNC
UltraVNC is completely free and open source. It is a bit more difficult to set up, you have to install the server component on the computer you want to log into and configure some settings.
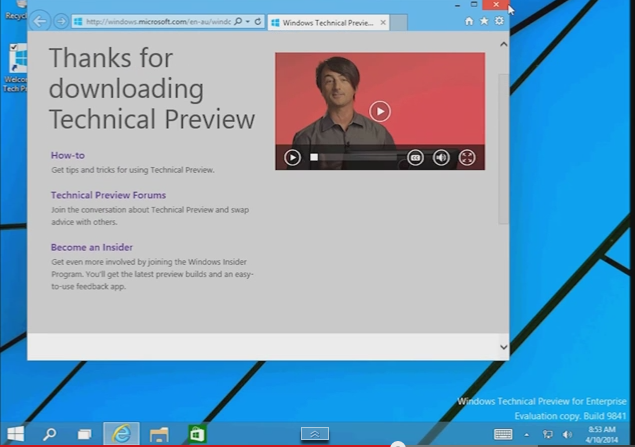
Windows 10 Technical Preview has been released and you can now download and install it.
I would recommend installing Windows 10 Technical Preview on a virtual machine or old PC not on your physical hardware that you use everyday, as this is a preview of Windows 10 not the final version it may have bugs that are not ironed out.
If you are going to install Windows 10 on your physical hardware make sure you back up all of your data first.
You can download Windows 10 Technical Preview from the download page.
Windows 10’s hardware requirements are very similar to Windows 8.1 and are as follows:
Processor : 1GHz or faster with support for PAE, NX, and SSE2
RAM : 1GB (32-bit) or 2GB (64-bit)
Hard disk space : 16GB
Graphics card : Microsoft DirectX 9 graphics device with WDDM driver
Hope you have fun playing with Windows 10 Technical Preview.