USB Drive Letters Keep Changing – How To Fix

I had a problem with a USB drive that the default letter kept changing.
Even when the USB drives letters were set using the disk management.
Disk management usually works so you can try setting the USB drive’s letter using that.
Follow these steps to allocate the drive letter:
Open the device manager by pressing the “windows key” and “r” at the same time to open the run box and type “diskmgmt.msc”
Right-click the USB drive that you want to change, and then click Change Drive Letter and Paths.

Click Change, click Assign the following drive letter, click the letter that you want to use, and then click OK.

Then test the changing the USB drives to make sure the drive letters stay the same. If that doesn’t work follow the steps below.

How To Fix USB Drive Letter Changing If Disk Management Doesn’t Work

To actually stop the USB drive letter changing there is a nice little utility that is quite cheap called USBDLM that allows you to set default drive letters.
To use USBDLM to allocate default USB drive letters just follow these steps.

Download USBDLM zip file from their website
Extract the zip file to C:\
Open the folder C:\USBDLM\
Open the file USBDLM_sample.ini
Add the drive letter you want to the USB Drive setting part
Save the file under in the same folder as USBDLM.ini
Run the _install.bat file as an administrator

You will then get a message saying that USBDLM will be running as a service. Allowing USBDLM to run as a service lets the utility run automatically at startup so it can assign the correct drive letter.

I have found that sometimes card readera can affect the reliability of this. If you have a card reader that puts heaps of drive letters in when nothing is plugged into the USB card reader than you will need to set some drive letters for them too, or remove the card reader.

Read More →
Replies: 0 / Share:

How To Password Protect Zip Files in Windows

Password protecting .zip files can be useful. This can allow you to password protect your files using a very common format. The methods of password protecting also uses encryption which scrambles the data to protect against third party software being able to read the data.

This is good for when you want to take important documents on a USB stick, then if you lose it your files are encrypted and password protected.

Password Protecting .zip Files In Windows

In Windows XP password protecting zip files is built in. All you need to do is:

  • Right click on the compressed folder and select Explore.
  • In File, select Add a Password. Enter the password and confirm the password.

This is not recommended as the quality of the encryption is very poor and there are a number of third party software tools that can crack it.

The recommended way is to use some software that uses a strong encryption system. There are both free and paid software that can do this.

We will look at 7Zip File Manager to manage the encryption and password protection of the zip files. This software is free and open source, 7Zip is available from the 7Zip Project website.

To use 7Zip to encrypt your zip files:

  • Download and install 7Zip with the default options
  • Select and right click on the files you want to password protect
  • Select 7Zip -> Add to Archive
  • A window will open asking for settings for the archive
  • Under encryption select 3AES-256
  • Under archive format select “ZIP
  • Hit OK
  • Thats it now your files are password protected and encrypted


Read More →
Replies: 0 / Share:

By default in Windows Server 2012 and 2012 R2 when automatic updates finish you have 3 days to reboot the server. After this time period next time you login to the server it will give you the message:

Restarting in 15 minutes. Windows server 2012 R2
Restarting in 14 minutes, 49 seconds Your PC needs to restart to finish installing important updates. If you’ve already saved anything, you can restart now. Otherwise, you should take a moment to save your work.

The problem with this is that you may not log into your server for weeks then all of a sudden you need to make a change or check some settings so you log into your Windows Server 2012 box or VM and then this message pops up. This can cause a whole lot of problems for a server that is in production, especially if this is a dedicated windows server for a specific application as this will restart the server and not allow users to interact with it.

I have not found any way to cancel this pending reboot.

I have tried using the command:

shutdown /a

This just gives a message saying no pending shutdown.

I read on some frorums people said to stop the Windows Update Service, this didn’t work for me, the server still rebooted.


Preventing the automatic reboot

Seems the only way to disable this really annoying feature is to configure the automatic updates policy.

You will need to make sure that you have this RollUp 2883201(http://support.microsoft.com/kb/2883201) installed. If you are using Windows Server 2012 R2 it should be included already.

Now you will need to open group policy and on a GPO that is allocated to your Servers enable the setting

Computer Configuration\Administrative Templates\Windows Components\Windows Update\Always automatically restart at the scheduled time

This will make your server reboot after downloading and installing updates. You will need to make sure that the server is set to install updates in at the maintenance time.


This video shows you how to setup the Group Policy so that the computer or server does not randomly reboot but installs the updates and reboots at a scheduled time


Read More →
Replies: 8 / Share:

Select options in the menu

This error happens when opening a file in word or the other Microsoft Office programs.

This seems to be a problem with an Microsoft Add-In that has been installed.

To fix this there are two options. The first is to disable office add-ins.

You can disable the office add-ins by:

  • Open the program (in this case Microsoft Word)
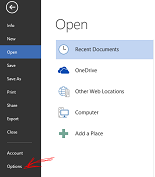
  • Select File -> Options
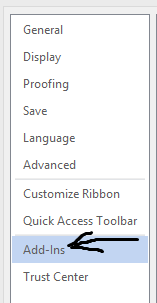
  • Select Add-Ins in the options menu
  • Disable them in this menu

If that doesn’t work you will need to recreate the user profileSelect Office Addins

To recreate the user profile on a domain you will need to :

  • Log in as a different Administrative user(Must be a member of the local administrators group)
  • Backup the User profile
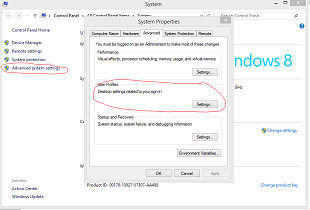
  • Right click on “My Computer” and select properties
  • Go to the Advanced tab
  • Click the “Settings” button under user profiles
  • Select the user profile that has the error and delete it
  • Reboot the PC
  • Log in as the user
  • Restore data back to the user account

To recreate the user profile that is not on a domain you will need to :

  • Log in as a different Administrative user(Must be a member of the local administrators group)
  • Backup the User profile
  • Right click on “My Computer” and select properties
  • Go to the Advanced tab
  • Click the “Settings” button under user profiles
  • Select the user profile that has the error and delete it
  • Reboot the PC
  • Log in as the administrative user
  • Create a new user account for the deleted account
  • Log in as the new user
  • Restore data back to the user account

system settings user profile small

Now when you open Microsoft Word you shouldn’t have the “There was a problem sending the command to the program” Error.

Read More →
Replies: 0 / Share:

Why Harden Windows Security On Your Network

Having a secure environment can significantly reduce the amount of break/fix work that you need to do. Things that securing your computers can help prevent are:

  • Viruses
  • Bloatware
  • Securing files and company data
  • Protecting against accidental data loss

This article will discuss how to secure Windows computers that are members of Active Directory and we will discuss securing these workstations using group policy settings. We will also discuss ideas on educating users so they have some awareness of computer security concepts.

I am not saying that you need to do every single item on this list, you can just pick what is right for your domain and what your users will accept. I am also not saying that doing these things will protect you 100% from security breaches but doing them will keep your network more secure than what it is without any of these domain security tips.

How To Secure Windows On Your Domain

Not Allowing Local Administrator Rights

By not allowing users to have local administrator rights this will not only stop them from installing unwanted software on their computers but it will also stop any websites that are compromised using the local user account to install malware or viruses.

Remove The Control Panel

You can remove users from having access to the control panel. This will stop users trying to customise their workstations or changing settings that they just shouldn’t be messing with.

You can disable users to have access to the control panel or you can just allow the users to have access to specific parts using group policy. To change these settings you need to go to the group policy editor and edit the policy (Or create a group policy object and deploy it to users that you want to restrict) that is for the users that you want to restrict.

Under the policy node:

User Configuration\Administrative Templates\Control Panel

There will be 4 options:

  • Always open All Control Panel items: This setting allows users full access to the control panel
  • Hide specified Control Panel items: This setting will hide control panel items that you specify in this setting.
  • Show only specified Control Panel items: This will hide all control panel items except the ones that you specify.
  • Prohibit access to the Control Panel: This will remove users rights completely to the control panel. They will not even see the option to open the control panel in the start menu.

Anti-Virus

Use a good Anti-Virus software. Make sure the software is kept up to date and that users do cannot disable or edit any of the settings in the Anti-Virus.

Spam Filter

Using a good spam filter is very important. Lots of malicious attacks are done using email, some are phishing scams and some are links to viruses or malware. If you have exchange there are many different spam filters available that will link directly on your exchange server, if you are using a hosted email solution than most email hosts will have a spam filtering service.

Firewall

Make sure the Standard Windows Firewall is enabled and that users do not have permissions to edit the firewall settings. This will stop users from making their own firewall rules to allow programs through. You can disable users access to the firewall and specify domain wide firewall rules in group policy.

I also recommenced using a hardware firewall on the edge of your network to protect the whole network from outside attack sources.

UAC – User Account Control

Make sure users have UAC enabled. If on a domain environment you can enable UAC through group policy. The settings to do this are under “Computer Configuration\Policies\Windows Settings\Security Settings\Local Policies\Security Options

Internet Explorer Security Zones

Internet Explorer is often used as an attack vector. You can set up domain wide Internet Explorer security zones under “User Configuration\Policies\Windows Settings\Internet Explorer Maintenance\Security“, in the security zones. Be sure to add any sites that you want to trust.

You can specify the home page under “User Configuration\Policies\Windows Settings\Internet Explorer Maintenance\URLs“, this will stop users being able to use different sites for their homepage. This also stops other software hijacking your users homepage and setting it to a fake search engine.

Set Up Software Restriction Policies

A software restriction policy only allows users on your domain to run software that is approved or it can be used to disable software from running in a specific folder. This can help to:

  • Fight viruses
  • Regulate which ActiveX controls can be downloaded
  • Run only digitally signed scripts
  • Enforce that only approved software is installed on system computers
  • Lockdown a machine

Read here for an in depth description of software policies.

Disabling users from running programs from the %appdata% folder in the users profile is a good step and can help prevent viruses like cryptolocker( See here for how to defend against cryptolocker) and malicious software running from emails. You can find the settings for software restriction policies in group policy under “Computer Configuration\Windows Settings\Security Settings\Software Restriction Policies”.

Only  Allow Users To Log Onto Specific Computers

In Active Directory you can specify users to only be allowed to log on to certain computers. You can lock this down to specific users on specific computers or you can only allow certain groups to log onto the computers.
Example: You only allow Accountants to log onto computer in the finance department.

Keeping Third Party Software Up To Date

Alot of commonly used software have security holes in them. Software like java, acrobat reader and adobe flash should all be kept up to date. This can be done though group policy. However you cannot install EXE files through group policy, but luckily most commonly used software is available as an MSI package which can be installed via group policy.

To do this:

  • Put the MSI package in a shared folder.
  • Create a GPO that is linked to the computers that you want the package deployed to.
  • Then edit the GPO and navigate to “Computer Configuration\Policies\Software Setting\Software installations“.
  • Right click inside the empty space and select “New>Software Package
  • Select your MSI package and check assigned
  • Close the group policy editor


Read More →

Replies: 0 / Share:

Sometimes the .camrec file from Camtasia Studio can get corrupted. When this happens you can recover the recording from the file.

You will be able to tell when the Camtasia Studio recording is corrupted because when you go to open the file with Camtasia Studio it crashes. When it crashes you will get an error message saying:

Camtasia Studio has stopped working

Windows is checking for a solution to the problem

This happened to me for quite some time before I figured out that my camtasia recording was corrupted.

Camtasia Studio actually records in the AVI format and then puts it in a file with the extention of <filename>.camrec.


To recover the file you will need to download and install 7Zip File Manager which is a free program and available here.

Once you have installed 7Zip you will need to open the camrec file that is corrupted with it.

To do this

  • Open 7Zip File Manager
  • Navigate to the folder the camrec file is
  • Right click on the file and select open
  • Find the .AVI file
  • Select the .AVI file
  • Click the Extract button in the ribbon at the top

Now if you go back to windows explorer the .AVI file that is the actual Camtasia recording will be recovered from the camrec file.


Read More →
Replies: 1 / Share:

Why Do We Need This Guidewindows xp

Now lets just get started with the fact that this guide is intended to be used as a last resort. Please try to get away from Windows XP as soon as possible.

Microsoft have killed support for Windows XP as of the 8th of April 2014. This means that Microsoft will not release any updates to Windows XP and that will leave systems running XP more and more vulnerable as times go on.

This guide is created for people using line of business software that does not support anything newer than Windows XP. Please try to run your software in a newer operating system it will make life a lot easier and reduce the security risks on your computer and network. You can also contact your software vendor and see if there is a version that does support newer operating systems and then migrate over to the new version.


Securing Windows XP


Remove Local Admin Rights

Removing users from the Local Administrators group is the first thing you should do.

This will stop users being able to install applications and also disable any software that is running under the local user account from changing system files and accessing the registry.

To do this you will just need to remove the users from the local administrator groups either through group policy or through local users and groups manager.


Use An Anti-Virus And Firewall That Supports Windows XP

Many of the major anti-virus software vendors are still supporting Windows XP even though Microsoft isn’t. Make sure that you have an anti-virus installed and that it is still supporting Windows XP and getting regular updates. This will help protect your Windows XP from viruses.

Using a strong firewall that supports Windows XP will also help you combat security threats. These can block unwanted network traffic that can potentially be harmful to your system. Make sure that the firewall is working both on inbound communication and outbound.

Both Symantec and Sophos are still releasing virus protection updates to Windows XP. These are not the same as the updates that Microsoft release for the operating system.


Put Your Windows XP Computers On A Sepperate Network

You should have your windows XP computers on a different network than all of your other computers or even better not connected to a network at all. Putting them on a different network isolates them from the rest of your environment that way if they get compromised the rest of your computers should not be affected.

Taking your XP computers off of a network completely will isolate them and then the Windows XP computers will not be exposed to anything that could infect or compromise the system.


Change Proxy Settings On Internet Explorer

Changing the proxy settings on Internet Explorer to 127.0.0.1 will disable users from browsing the internet. Browsing the internet is not safe on Windows XP and I do not recommend you allow users to browse the internet at all on the Windows XP machines.


Disable The Guest Account

Make sure the Guest account is disabled.  This will stop users without a user account on the computer being able to log on to the computer.

To do this:

  • Open the control panel
  • Open User Account Settings
  • Click Guest
  • Select Turn Off Guest Account

The guest account will be deactivated.

Disable Unnecessary Services

You can help secure Windows XP by disabling services like:

  • Telnet
  • Universal Plug and Play Device Host
  • IIS (not installed by default)
  • Netmeeting Remote Desktop Sharing
  • Remote Desktop Help Session Manager
  • Remote Registry
  • Routing & Remote Access
  • SSDP Discovery Service
  • Error Reporting Service
  • Messenger Service

These services can be disabled if you do not use them. Any other unnecessary services may be disabled too. The more services disabled the less attack vectors there are on your XP system.

Use Software Restriction Policies

Software restriction policies provide administrators with the ability to control what software they want to allow to run. By using a software restriction policy to lock down Windows XP, an administrator can prevent unwanted programs from running; this includes viruses and Trojan horses, or other software that is known to cause conflicts when installed. You can set up a software restriction policy both through group policy on a domain network or using the local security policy on a standalone computer.

Remove Any Unnecessary Programs And Add-ons

Remove programs like:

  • Java
  • Flash
  • Adobe Acrobat Reader
  • Internet Browser Toolbars
  • Silverlight

If you do not need these programs for your computers to run uninstall them. These can all act as attack vectors and without security updates they will become an easier target for hackers and malicious programs.

Any other programs that try to interact with the internet should also be removed.


You may also want to read this article on locking down domain computers.

If you have any other suggestions please let us know in the comment section below.

Read More →
Replies: 1 / Share:

This error will show up when you go to run a powershell script in your PowerShell ISE or on the PowerShell terminal.

If you get an error similar to this:

Disabled Powershell Script Error
File C:\Users\jake\Documents\test.ps1 cannot be loaded because running scripts is
disabled on this system. For more information, see about_Execution_Policies at
http://go.microsoft.com/fwlink/?LinkID=135170.
+ CategoryInfo : SecurityError: (:) [], ParentContainsErrorRecordExcept
ion
+ FullyQualifiedErrorId : UnauthorizedAccess

To fix this powershell error you need to activate powershell scripts on your system.

Run the powershell terminal as administrator by right clicking on the powershell terminal shortcut and selecting run as administrator.

Then run the following command:

  • set-executionpolicy remotesigned

  • Then type “Y” for yes and press enter

allow powershell scripts to runNow you will be able to run PowerShell scripts in both your PowerShell ISE and in the PowerShell Terminal.

Now the message that running scripts is disabled on this system will not appear anymore.

Do you know what a cmdlet is? If not read this post entitled what is a cmdlet.

Related Posts:

Scripting a mapped network drive

Restart All Exchange Services With PowerShell Script

Read More →
Replies: 6 / Share:

What is Remote Desktop?

Remote Desktop Protocol or RDP is the built into Microsoft Windows products. Remote Desktop Protocol is a proprietary protocol which is used to control another system, unlike SSH and Telnet RDP gives you a graphical interface to interact with the remote system.

When you remote into a computer/server using RDP some of the normal shortcut keys are changed for the remote computer.

RDP Shortcut Keys

ALT+PAGE UP – Switches between programs from left to right.

ALT+PAGE DOWN – Switches between programs for right to left.

ALT+INSERT – Cycles through the programs in the order they were started.

ALT+HOME – Displays the Start menu.

CTRL+ALT+BREAK – Switches the client between full-screen mode and window mode.

CTRL+ALT+END – Brings up the Windows Security dialog box.

ALT+DELETE – Displays the Windows menu.

CTRL+ALT+MINUS SIGN (-) – Places a snapshot of the active window, within the client, on the Remote Desktop Session Host (RD Session Host) server clipboard (provides the same functionality as pressing ALT+PRINT SCREEN on the local computer).

CTRL+ALT+PLUS SIGN (+) – Places a snapshot of the entire client windows area on the RD Session Host server clipboard (provides the same functionality as pressing PRINT SCREEN on the local computer).

Read More →
Replies: 1 / Share:

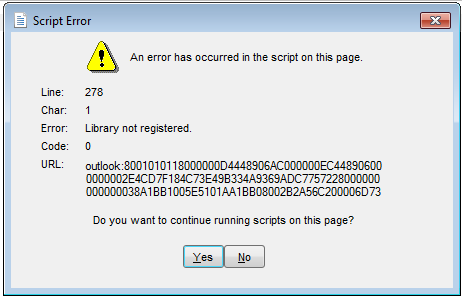
Outlook script errorThis error happened on one of my client machines today. Every time Outlook 2013 was opened this error would pop up:

Script Error: An error has occurred in the script on this page

Line: 278

Char 1

Error: Library not Registered

Code: 0

URL: outlook:800101011800000004392D05AC0000001C392D05000000002E4_ CD7F184C73E49B334A9369ADC7757228000000000000038A1BB1005E5101AA1_
BB08002B2A56C200006D737073742E646C6C00000000004E495441F9BFB8010_
0AA0037D96E0000000043003A005C00550073006500720073005C004D00690_
07400630068005C0041007000700044006100740061005C004C006F006300610_
06C005C004D006900630072006F0073006F00660074005C004F00750074006C_
006F006F006B005C004F00750074006C006F006F006B002E007000730074000000

Do you want to continue running scripts on this page?

These sort of errors can be caused by bad or corrupt add-ons so I started outlook in safe mode using outlook.exe /safe in a run box but still I got the script error.

I noticed that Outlook 2013 was opening to personal folders by default.

I changed the default opening folder to Inbox instead. (See: How to change default startup folder in outlook)

Then when I opened outlook it opened normally. If I selected personal folders the script error occurred again.

So it turns out this error is something to do with the personal folders.

I decided to do an online repair.

After that the error was fixed. I am not really sure what caused this error, but it seemed to fix it. If anyone knows how to the reason behind this error please let me know.

Read More →
Replies: 0 / Share: