Asterisk is a free and open source framework for building communications applications and is sponsored by Digium.
Asterisk turns an ordinary computer into a communications server. Asterisk powers IP PBX systems, VoIP gateways, conference servers and is used by small businesses, large businesses, call centers, carriers and governments worldwide
This video shows you the basic steps for installing AsteriskNOW. I am using this for testing IP PBX and SIP, but it can be used for much more.
PERT stands for Program Evaluation Review Technique and is sometimes referred to a a Project Network Diagram
The PERT chart is a project management tool that is used to schedule, organise and coordinate tasks for a project.
The PERT chart is a graphical medium to demonstrate the project as a network diagram made up of numbered rectangles or circles that represents milestones or events that are linked together with lines that represent the work packages of the project.
The PERT chart is most useful for planning and tracking entire projects and scheduling in the implementation phase of the project, it is also very useful to make a PERT chart before creating the work breakdown structure as it will give you a graphical representation of the work packages to work from.
How to create a PERT chart
Identify the tasks
Put the tasks in order
Identify which tasks can be completed at the same time
Identify which tasks are dependent on each other
Put the tasks in order
Give all of the tasks a number to reference off
Identify the task durations
PERT and the Critical Path
The PERT chart can help you identify the critical path of a project. The critical path is all of the tasks that need to be started or completed on time to ensure that the project will stay on schedule and there are no delays.
If you are like me than you have tweaked some settings a couple of releases ago(I did in in 12.04, that was two years ago) and want to revert back to the default settings for Unity. Some other reasons you may want to reset unity to default settings are:
You might want the feel of a fresh start, but without having to actually reinstall the whole Ubuntu OS
You’re experiencing issues and want to make sure that you haven’t got some strange setting affecting your OS
What does resetting unity do?
The number of workspaces available
Launcher size, behaviour and the animations
How it acts in multi monitor environments
Shortcuts for the HUD, Window Spread, Alt+Tab, etc
Compiz animations and effects
Instructions on resetting Unity on Ubuntu 13.10
Open a Terminal and type the following command to reset animations, workspaces, launcher size, etc:
dconf reset -f /org/compiz/
Log out of your desktop session and back into Unity for changes to take effect.
Now to set the Unity launcher with its default icons, open a terminal and run the following command:
unity –reset-icons
Unity will restart at the end of the command. If you close the terminal you will also restart unity, so you are best off to log out and log back in after running this command.
An error occurred while using SSL configuration for endpoint 0.0.0.0:443. The error status code is contained within the returned data.
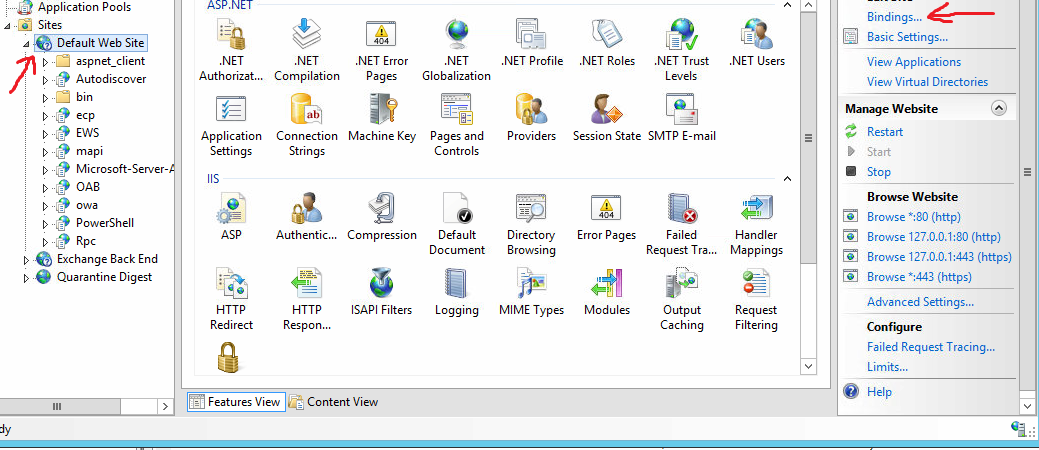
This error is because the SSL certificate is not binded to the Exchange site properly. This will stop outlook being able to connect to exchange and also if you browse to OWA or ECP you will just get a 404 error.
To fix this:
Open IIS Manager
Expand your <server name>
Expand Sites
Select “Default Web Site“
On the Actions Pane select Bindings
Under the Site Bindings open both https entries and add the certificate to the site
Now go to your desktop and open outlook. Now you will be connected to your exchange server and be able to send and receive emails.
After installing the update you will need to re-index the WSUS database. To do this you will need to use the sqlcmd utility and also download the WSUS re-index script(you can download that from here):
The call to sqlcmd needs to have a -I (capital i) parameter, which tells SQL to run the script with QUOTED_IDENTIFIERS enabled. and <scriptlocation> needs to be the location of the downloaded script.
Once that is done you will also want to run the WSUS server cleanup wizard by following these steps:
Open the WSUS administration console
Expand the server in the left pane and select options
In the options window select server cleanup wizard
Now open a command prompt and run the command:
iisreset
Now to complete this fix then restart the following services:
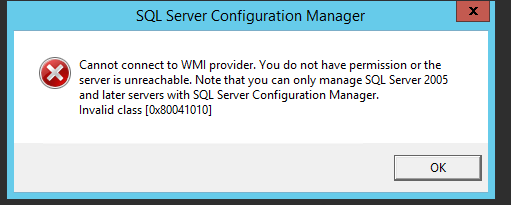
The other day I went to open the SQL Configuration Manager on our SQL Server 2012 installation and I got the following error message:
“Cannot connect to WMI provider. You do not have permission or the server is unreachable. Note that you can only manage SQL Server 2005 and later servers with the SQL Server Configuration Manger.
Invalid class[0x80041010]”
So I know that I had no SQL Server 2005 so that little warning doesn’t apply to this.
According to Microsoft this error happens because
the WMI provider is removed when you uninstall an instance of SQL Server. The 32-bit instance and the 64-bit instance of SQL Server share the same WMI configuration file. Which is strange because I haven’t uninstalled any instances of SQL Server from the server.
Fix the Cannot connect to WMI provider error:
To fix this SQL error you need to:
Open a command prompt, type the following command, and then press ENTER: mofcomp “%programfiles(x86)%\Microsoft SQL Server\number\Shared\sqlmgmproviderxpsp2up.mof”
The value of number depends on the version of SQL Server make sure you change the value according to the server table below:
Microsoft SQL Server 2012
110
Microsoft SQL Server 2008 R2
100
Microsoft SQL Server 2008
100
Microsoft SQL Server 2005
90
Now restart the WMI service for the changes to take affect.
Now you should be able to run the SQL Server Configuration Manager properly.
I had a problem with a USB drive that the default letter kept changing.
Even when the USB drives letters were set using the disk management.
Disk management usually works so you can try setting the USB drive’s letter using that.
Follow these steps to allocate the drive letter:
Open the device manager by pressing the “windows key” and “r” at the same time to open the run box and type “diskmgmt.msc”
Right-click the USB drive that you want to change, and then click Change Drive Letter and Paths.
Click Change, click Assign the following drive letter, click the letter that you want to use, and then click OK.
Then test the changing the USB drives to make sure the drive letters stay the same. If that doesn’t work follow the steps below.
How To Fix USB Drive Letter Changing If Disk Management Doesn’t Work
To actually stop the USB drive letter changing there is a nice little utility that is quite cheap called USBDLM that allows you to set default drive letters.
To use USBDLM to allocate default USB drive letters just follow these steps.
Download USBDLM zip file from their website
Extract the zip file to C:\
Open the folder C:\USBDLM\
Open the file USBDLM_sample.ini
Add the drive letter you want to the USB Drive setting part
Save the file under in the same folder as USBDLM.ini
Run the _install.bat file as an administrator
You will then get a message saying that USBDLM will be running as a service. Allowing USBDLM to run as a service lets the utility run automatically at startup so it can assign the correct drive letter.
I have found that sometimes card readera can affect the reliability of this. If you have a card reader that puts heaps of drive letters in when nothing is plugged into the USB card reader than you will need to set some drive letters for them too, or remove the card reader.
Password protecting .zip files can be useful. This can allow you to password protect your files using a very common format. The methods of password protecting also uses encryption which scrambles the data to protect against third party software being able to read the data.
This is good for when you want to take important documents on a USB stick, then if you lose it your files are encrypted and password protected.
Password Protecting .zip Files In Windows
In Windows XP password protecting zip files is built in. All you need to do is:
Right click on the compressed folder and select Explore.
In File, select Add a Password. Enter the password and confirm the password.
This is not recommended as the quality of the encryption is very poor and there are a number of third party software tools that can crack it.
The recommended way is to use some software that uses a strong encryption system. There are both free and paid software that can do this.
We will look at 7Zip File Manager to manage the encryption and password protection of the zip files. This software is free and open source, 7Zip is available from the 7Zip Project website.
To use 7Zip to encrypt your zip files:
Download and install 7Zip with the default options
Select and right click on the files you want to password protect
Select 7Zip -> Add to Archive
A window will open asking for settings for the archive
Under encryption select 3AES-256
Under archive format select “ZIP“
Hit OK
Thats it now your files are password protected and encrypted
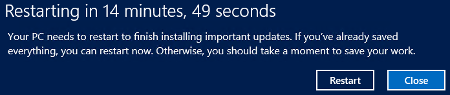
By default in Windows Server 2012 and 2012 R2 when automatic updates finish you have 3 days to reboot the server. After this time period next time you login to the server it will give you the message:
Restarting in 14 minutes, 49 seconds Your PC needs to restart to finish installing important updates. If you’ve already saved anything, you can restart now. Otherwise, you should take a moment to save your work.
The problem with this is that you may not log into your server for weeks then all of a sudden you need to make a change or check some settings so you log into your Windows Server 2012 box or VM and then this message pops up. This can cause a whole lot of problems for a server that is in production, especially if this is a dedicated windows server for a specific application as this will restart the server and not allow users to interact with it.
I have not found any way to cancel this pending reboot.
I have tried using the command:
shutdown /a
This just gives a message saying no pending shutdown.
I read on some frorums people said to stop the Windows Update Service, this didn’t work for me, the server still rebooted.
Preventing the automatic reboot
Seems the only way to disable this really annoying feature is to configure the automatic updates policy.
You will need to make sure that you have this RollUp 2883201(http://support.microsoft.com/kb/2883201) installed. If you are using Windows Server 2012 R2 it should be included already.
Now you will need to open group policy and on a GPO that is allocated to your Servers enable the setting
Computer Configuration\Administrative Templates\Windows Components\Windows Update\Always automatically restart at the scheduled time
This will make your server reboot after downloading and installing updates. You will need to make sure that the server is set to install updates in at the maintenance time.
This video shows you how to setup the Group Policy so that the computer or server does not randomly reboot but installs the updates and reboots at a scheduled time