The  Event 13 error happens when backing up a Hyper-V virtual machine from Server 2008 or Server 2008 R2 and the guest VM is Server 2012 or 2012 R2.

A “scope snapshot” is a  volume snapshot that is new for Windows Server 2012, this means that it is not supported by the host OS (Server 2008 or 2008 R2).  Being that the “volume snapshot” is not supported by the host machine it needs to be disabled on the guest machine.

Log Name:      Application
Source:        vmicvss
Date:          11/29/2012 9:00:05 PM
Event ID:      13
Task Category: None
Level:         Error
Keywords:      Classic
User:          N/A
Computer:      SERVER.mydomain.local
Description:
Windows cannot perform an online backup of this system because scoped snapshots are enabled. To resolve this, disable scoped snapshots by creating the following registry value on this computer:
PATH: HKEY_LOCAL_MACHINE\SOFTWARE\Microsoft\Windows NT\CurrentVersion\SystemRestore\
DWORD: ScopeSnapshots
Value: 0

How to fix VMICVSS Event 13

You can fix this error by creating the registry key described in the error under:

HKEY_LOCAL_MACHINE\SOFTWARE\Microsoft\Windows NT\CurrentVersion\SystemRestore\

You can do this by:

  • Opening the registry editer by typing regedit in the start menu
  • Navigate to the HKEY_LOCAL_MACHINE\SOFTWARE\Microsoft\Windows NT\CurrentVersion\SystemRestore\ if the SystemRestore key does not exist right click on CurrentVersion and select new key and call it SystemRestore
  • Right click on the SystemRestore key and and select new DWord
  • Call the DWord value ScopeSnapshots and give it the value of 0
  • Exit the registry editor and reboot the server


Read More →
Replies: 0 / Share:

NMap(stands for network mapper) is a small utility that has both a command line option called NMap and also a graphical option called Zenmap. It is a free and open source program that is licensed under the GNU GPL(more details on the GNU GPL license can be found in my introduction to Linux).

Why do you need a network scanner?

Network scanning can be very useful in the IT world and can help you:
Make an inventory of devices on your network
Test security of your network or devices
Monitoring uptime
Troubleshoot network issues

Why use NMap for network scanning?

Can be used for simple and complex network scanning tasks: NMap can be used for just scanning a simple network range to see if devices are connected all the way to in depth port scanning and operating system detection.
Can be integrated into software that you are writing: Because NMap is open source and licensed under the GNU GPL you are able to integrate it into other software that you are creating so if you want your application to be able to scan the network then you can implement NMap code into it(just make sure that you do it so it is compliant with the license).
Cross platform support: NMap works on Linux, Windows, BSD, OSX and more.
It’s free: NMap does not cost anything and you are free to modify the software to your liking, so if you want to extend it you can. (it is used in software too, Spiceworks uses it to do network audits!!)
Documentation: NMap is a popular utility and it has been quite well documented, you can access the documentation on the NMap website.

NMap in the CLI

Scanning network

Simple network scan
To do a simple network scan that will just run with the options set to default to all IP addresses in a given range you can just run:

nmap 192.168.0.1-254

As it looks that is scanning all IP addresses on the 192.168.0.0/24 subnet, which means it will scan:
192.168.0.1
192.168.0.2
192.168.0.3
And so on and so on until it reaches
192.168.0.254

Read More →
Replies: 0 / Share:

Resetting Windows password on computer with Secure boot

Secure boot and UEFI BIOS is something that has been introduced with windows 8 and 8.1.
Secure boot stops you from accessing the hard drive when booting to CD or USB and therefore stops you using traditional tools to reset your windows password.

To bypass this you need to remove your hard drive and connect it to another computer. I use a USB dock to do this, using a USB docking station allows you direct access to hard drives and gives you plug and play functionality.
You will need a computer with Linux installed, preferably Kali Linux as this comes the the packages pre installed. If you are using a different distro(if you are not sure what a distro is have a look at our Introduction to Linux)
I have used a Virtual Machine and attached the hard drive to it and then booted to Kali Linux.

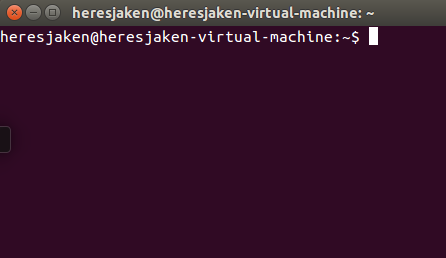
Once you have booted up the Linux VM you will need to open a terminal.
Then navigate to the Media folder by typing the command:

cd /Media

Then run the ls command to see what drives you have attached. Identify which drive has is your windows c: drive.
Change the working directory to the c:/windows/system32/config by running the command:

cd Windows/System32/config

Once in the directory you will need to make sure that the SAM database is in this folder. To do that run the command:

ls -l SAM*

ls sam password reset
You should see the SAM database I that directory.


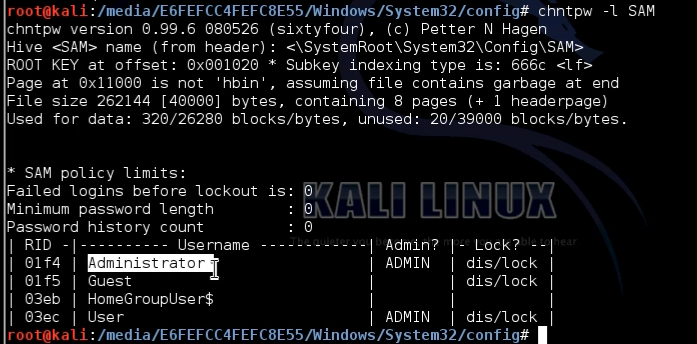
Now you will need to view what users are in the SAM database you do that by running the command:

chntpw sam
You will see a list of users that are currently created in the SAM database

chntpw -l SAM


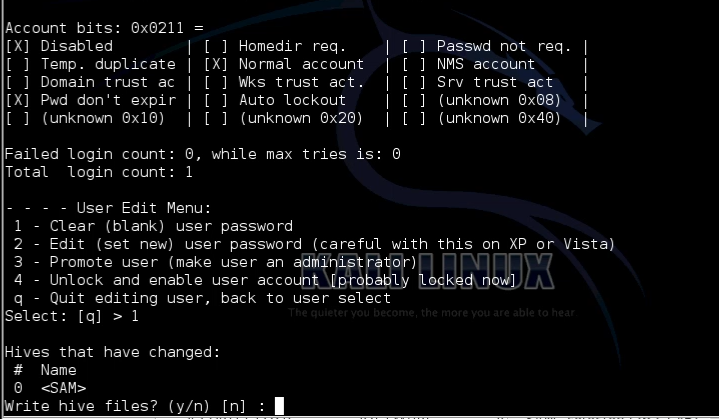
Now you want to reset the password for the Administrator user and also enable the user by running the command

chntpw -u Administrator SAM

Then select option 1 to clear the password
resetting windows password kali linux
Run the command again

chntpw – Administrator SAM

and select option 4 to enable the account

Now install the hard drive in the original computer and boot to Windows. If you had secure boot on your computer you will need to make sure that it is still enabled in BIOS.

You should now be able to log in as the built in Administrator account, then you just need to reset the original user accounts password.

To do this open run a command prompt as administrator and type the command(make sure to replace <username> with your username:

net user <username> *

reset user password secure boot
Reset the users password

Now log out of the administrator user and log in as your user, using the password that you have just set.

Now  run a command prompt as administrator and type the command:

net user administrator /active:no

disable admin account
Says that the command has worked successfully and the administrator user is no longer active

Now your password has been reset.

Read More →
Replies: 3 / Share:

How to install Linux

As I went over in the introduction to Linux there are many different distros of Linux which means there is no one way to install Linux, in fact if you want to use Linux you do not even need to install it you can use what is called ” Linux Live”, people often use Linux live environments to troubleshoot computer issues or you can even use Linux live to reset your forgotten windows password.
I will be using Ubuntu to demonstrate the Linux installation process simply because I like it and I use it as an everyday OS on my laptop. If you are just learning Linux then I would recommend using either Ubuntu or Linux Mint to learn on. Both of those distros have a nice GUI(Graphical User Interface) and both have a fair bit of free community support.

The Linux installation process

To install Linux first you will need to download the distro that you want to use. This will most likely come in an .ISO format.

You will need to burn the .ISO file to a CD or DVD. I am using Ubuntu which is available for free from their download page, you can donate to the project when you are downloading the ISO.

Once you have a disk with the Linux files on it you just need to insert the disk into a computer and then boot to the disk. To do this you may need to change the boot priority in BIOS, or select the boot menu on start-up.

The computer will now boot into the Linux installation environment, follow the prompts to install then reboot.

Once your system has rebooted you should enter your freshly installed Linux environment.

Now you will have Linux installed on your system.

Read More →
Replies: 0 / Share:

File system format in linux

Linux can have many different file system formats which for someone that is used to Windows is a bit different because in Windows you never have to worry about it because Microsoft just defaults to NTFS.
Because it is open source it offers many different options. Linux not limit users or administrators in the file system they should use.

The file system is basically the way that data is stored on the hard drive, SSD or whatever storage medium you are using.

Most Linux file systems include a feature called journalling. Journalling is used to reduce the chance of file corruption, it does this by keeping a track of files that are being written to disk. If power is lost while data is being written to the disk then it can check the journal when the power comes back on and be able to remember where it left off.
The only issue with journaling is that there may be some performance decrease, but with modern hardware you will not be able to notice the difference.

Some of the file systems you can choose from are:

Linux’s directory structure

If you are new to Linux and used to Windows the way the Linux’s directory structure is layer out can be quite difficult to understand.

Everything in Linux is located under the / directory which is known as the root directory. This is sort of like the C: drive in Windows, but Linux does not actually give drive letters at all. Where a different partition in windows would show up as a different drive letter in lines it will just show as another directory under the root directory.

/etc – Configuration Files

Contains configuration files required by all programs.
This is also where the startup and shutdown shell scripts used to start and stop individual programs.
For example: /etc/resolv.conf, /etc/logrotate.conf

/sbin – System Binaries

Just like /bin, /sbin also contains binary executables.
The commands under the /sbin directory are more geared towards system maintenance purposes and will be regularly used by system administrators.
For example: iptables, reboot, fdisk, ifconfig

/dev – Device Filess

Contains device files.
These include terminal devices, usb, or any device attached to the system.
For example: /dev/tty1, /dev/usbmon0

/proc – Process Informations

Contains information about system process.
This is a pseudo filesystem contains information about running process. For example: /proc/{pid} directory contains information about the process with that particular pid.
This is a virtual filesystem with text information about system resources. For example: /proc/uptime

/var – Variable Filess

var stands for variable files.
Content of the files that are expected to grow can be found under this directory.
This includes — system log files (/var/log); packages and database files (/var/lib); emails (/var/mail); print queues (/var/spool); lock files (/var/lock); temp files needed across reboots (/var/tmp);

/usr – User Programss

Contains binaries, libraries, documentation, and source-code for second level programs.
/usr/bin contains binary files for user programs. If you can’t find a user binary under /bin, look under /usr/bin. For example: at, awk, cc, less, scp
/usr/sbin contains binary files for system administrators. If you can’t find a system binary under /sbin, look under /usr/sbin. For example: atd, cron, sshd, useradd, userdel
/usr/lib contains libraries for /usr/bin and /usr/sbin
/usr/local contains users programs that you install from source. For example, when you install apache from source, it goes under /usr/local/apache2

/lib – System Libraries

Contains library files that supports the binaries located under /bin and /sbin
Library filenames are either ld* or lib*.so.*
For example: ld-2.11.1.so, libncurses.so.5.7

/opt – Optional add-on Applicationss

opt stands for optional and it contains add-on applications from individual vendors.
add-on applications should be installed under either /opt/ or /opt/ sub-directory.

/srv – Service Data

srv stands for service. Contains server specific services related data.
For example, /srv/cvs contains CVS related data.

/media – Removable Media Devicess

Temporary mount directory for removable devices.
For examples, /media/cdrom for CD-ROM; /media/floppy for floppy drives; /media/cdrecorder for CD writer

/mnt – Mount Directorys

Temporary mount directory where sysadmins can mount filesystems.

/boot – Boot Loader Filess

Contains boot loader related files.
Kernel initrd, vmlinux, grub files are located under /boot
For example: initrd.img-2.6.32-24-generic, vmlinuz-2.6.32-24-generic

/home – Home Directories

Home directories for all users to store their personal files.
For example: /home/user and /home/jake

Read More →
Replies: 0 / Share:

Introduction to RDP – Remote Desktop Protocol

RDP or Remote Desktop Protocol is used to get a remote session into a Windows or Windows Server operating system. This unlike other tools like telnet gives you a graphical session to your remote computer, this means you can log in and get your normal Windows desktop environment.
Microsoft have released official Remote Desktop applications on the following platforms:

  • Mac OSX
  • Andoid
  • iOS
  • Windows phone

This means that you can work remotely from your mobile devices and also other platforms. While there is no official RDP application for Linux there are third party applications that will allow you to use the RDP protocol from Linux.

You can only use remote desktop to remote access Windows Pro or Windows Server products. Windows Home editions will not allow remote desktop access. You can remote from Windows Home editions into Professional editions though.

Why is Remote Desktop used

Remote Desktop is commonly used to administer Windows Servers and also in a terminal server(now called Remote Desktop Services) environment. Because the RDP application is built into server by default it is easy to set up and does not need any extra software installed on the server.

RDP security concerns

The Remote Desktop Protocol does come with some security issues. If you use RDP from an unsecured network(like free WiFi in cafe) or somebody gains access to your network the traffic can be sniffed and compromised.
It is best practice to use a VPN to connect to the local network from an outside network to encrypt the traffic, this will increase the security of your RDP connection.

Alternatives to RDP

Sometimes you will not be able to use RDP to connect to Windows computers, this could be because you just want to log into the computer once and you cannot get a firewall rule configured or because you want the end user to see what you are doing. These programs do not come included in Windows, some popular examples of these are:

Teamviewer

Team viewer has a free version if you are using it for non-commercial usage. Teamviewer works by running the teamviewer program on both computers. If you are using it in a business environment than you need to pay for a licence. With teamviewer people on both sides will be able to see what is being done.

Logmein

With Logmein you install the application on a PC and then access it through a web portal. Logmein does not have a free version if you want to use it then you will need to pay.

UltraVNC

UltraVNC is completely free and open source. It is a bit more difficult to set up, you have to install the server component on the computer you want to log into and configure some settings.

Read More →
Replies: 0 / Share:

Introduction to Linux terminal

What is the terminal?

The terminal(which is also known as the shell) is basically a program that takes the commands that you type on your keyboard and and passes them through to the operating system to complete them. Back in the old days this was the only way to interact with computer, there was no way to graphically interact with computers.
Now days though there are GUIs(Graphical User Interfaces) that allow point and click integration with your computer but there is still the CLI(Command Line Interface) and with Linux a lot more can be done using the CLI, which is the terminal.
Linux is heavily reliant on the terminal, most versions of Linux that get released as a server version do not have a graphical interface at all, when you boot into the OS you will go straight into the terminal.

Remember in Linux that everything is case sensitive, this includes directories, files and commands.

Getting help for Linux commands

There are a couple of ways to get help on how to use Linux commands in the terminal.

The MAN pages

The Linux “man pages” are short for manual pages, these pages are the documentation for each command in Linux. They can contain procedural help for the commands and also sometimes tell you why the command was created.
You can access the man pages by typing man then typing the command that you want more information on.

Asking for help

This may sound funny but you can actually ask the terminal for help. To do this you can just type in –help at the end of the command. This will give you information about the syntax and options that can be used with the command.

The internet

The Internet is a great resource(just look you are reading this on the Internet) and there is a wealth of information about Linux on the Internet. There are also heaps of forums and communities that you can join to get free support and also join in on discussions about Linux. Most distros will have a forums section on their website.

Navigation in the Linux terminal

In a graphical environment you will usually have some sort of file manager to view the directories and files but in the terminal you do not, when using the Linux terminal you will need to rely on commands to navigate the file structure.

cd

the command cd stands for change directory. Using the cd command will allow you to change directory. An example of this is “cd /” which will take you to the root directory of Linux.

pwd

The command pwd stands for print working directory which as it sounds shows you what directory you are currently working in.
When you first log into Linux you will start in the “home” directory, by default the home directory is located at /home/, this can be changed though.

ls

The ls command lists all of the files and folders that are in your current working directory. You can also use the ls command to look in a different directory by adding the path to the directory after the ls command.

When you want to change the working directory you can use the cd command. All you need to do is type cd followed by the path of the directory that you want to go to. There are two different ways to do this, the first is by typing the relative path, which is the path from your current directory or you can use a absolute path which begins at the root directory.
When using a absolute path with the cd command you will need to put in a backslash before the path, remember that an absolute path means you are starting at the root directory. When you want to use the cd command with a relative path you can just type in the next folder without the backslash.

cd

the command cd stands for change directory. Using the cd command will allow you to change directory. An example of this is “cd /” which will take you to the root directory of Linux.

Editing, copying, moving and creating

mkdir

The command mkdir is used for making directories, to do this you just need to run the command mkdir then and the folder path to the end.

cp

The cp command is for copying directories or files.

mv

The mv command is for moving directories or files, this will completely remove the file or directly and place it to where you want it.

rm

The rm command is to remove directories or files. This will completely delete them from your hard drive.

Packages in Linux

Software in Linux works different than software in Windows, many of the programs you want to install on Linux you will need to download from “repositories” and use a package manager to install them. While you can compile software from source in Linux, the package managers can handle this for you. There are a number of package managers for the Linux terminal. The two popular ones are apt-get and yum. Both of these will allow you to download and install software from repositories to your Linux system.

Read More →
Replies: 0 / Share:

Introduction to Linux

What is Linux?

Linux is an Open Source operating system(also known as an OS) that was created by Linus Torvalds in 1991.

Linux is POSIX compliant which means that it is UNIX like, many of the commands that work on UNIX will also work on Linux. Do not be confused though, linux and UNIX are completely different operating systems.

GNU GPL and Linux licensing

The GNU GPL or GNU General Public License is what keeps Linux open and free. The GNU GPL license is the most widely used free software license and it guarantees end users the freedoms to use, modify, share and study the software, this if often referred to as copy left(as in the opposite to copyright).

For further reading on the GNU GPL license read the GNU website.

Linux licensing can get complicated so make sure that if you are going to Linux check the license information before you use it. Just because a lot of Linux versions are completely free does not mean all are, some distributions you need to pay licensing fees. Even with the versions that you need to pay licensing fees you will still be able to read the source code because it is open source.

As of June 2014, more than 97% of the world’s 500 fastest supercomputers run some variant of Linux

What are Linux Distros?

Distro is short for distribution, a Linux Distro is basically a version of Linux. There are many different versions of Linux some popular ones are:

  • Ubuntu
  • Linux Mint
  • Debian
  • Fedora
  • Centos

Before installing Linux make sure your distro does what you want it to do. Many distros are designed for a particular purpose, like Asterisk which is designed to be a phone system or ClearOS which is designed to be a Small Business Server.

Linux ROOT and its importance

In Linux root means with the highest privileges. The root user(also called superuser) has the highest privileges possible and is able to do anything on the Linux operating system.

Root can also mean the highest place in the folder structure. The root of the operating system is where it is installed, in a comparison to Windows the root of the OS would be the C: drive.

What is Linux used for in the real world?

Linux is used in the real world for many different purposes some of these include:

Running mobile devices

If you didn’t know one of the worlds most popular operating systems is actually a version of Linux. The android operating system which powers over a billion devices is a Linux operating system, although android is the most popular(at the time of writing this) there are other distros that are targeted at mobile devices such as:

  • Firefox OS
  • Open WebOS
  • Tizen
  • And more

Servers

Linux is used for many servers worldwide, because of the way Linux is built it is a very stable platform to put on your server. People use it for server operating systems because it can reduce costs and also is more secure.

Desktops

Linux works fine on desktops, it is a little bit unrefined but it is always improving. Linux Mint is designed to be a desktop operating system and it is quite user friendly.

Read More →
Replies: 0 / Share:

system problem programThis happened for me after upgrading Ubuntu 12.10 to Ubuntu 13.04.

This appears to be because there is a crash report and Ubuntu is not clearing it.

How to fix System program problem detected error

First you need to open a terminal session then run the following command:

sudo rm /var/crash/*

What that command does is remove all of the old crash reports.


If this does not fix the popup then you have a deeper problem and may need to investigate it further.


Read More →
Replies: 0 / Share:

How To Install Windows 10 Technical Preview

Windows 10 Technical Preview has been released and you can now download and install it.

I would recommend installing Windows 10 Technical Preview on a virtual machine or old PC not on your physical hardware that you use everyday, as this is a preview of Windows 10 not the final version it may have bugs that are not ironed out.

If you are going to install Windows 10 on your physical hardware make sure you back up all of your data first.

You can download Windows 10 Technical Preview from the download page.

Windows 10’s hardware requirements are very similar to Windows 8.1 and are as follows:

  • Processor : 1GHz or faster with support for PAE, NX, and SSE2
  • RAM : 1GB (32-bit) or 2GB (64-bit)
  • Hard disk space : 16GB
  • Graphics card : Microsoft DirectX 9 graphics device with WDDM driver

Hope you have fun playing with Windows 10 Technical Preview.

Read More →
Replies: 0 / Share: