How to setup Multi Factor Authentication in Office 365 – Two Factor Authentication

What is Multi Factor Authentication?

Multi-factor authentication (MFA) is a security system that requires more than one method of authentication from independent categories of credentials to verify the user’s identity for a login or other transaction.

In Office 365 the way MFA works is that you use your normal username & password but after you have verified that factor of authentication you are then sent a text message (SMS Message) to your mobile phone with a code to enter into the login screen.

This increases security because if someone does find out your username & password they still cannot login to your account without your mobile phone.


Setting up MFA on Office 365

You will need to be an administrator of your office 365 tenant to set this up.

MFA is a free service that you get with Office 365. At the very least you should have MFA enabled on all administrative users and if you can you should have it enabled on all Office 365 user accounts.

  1.  Log into the Office 365 admin center
  2. Go to Users > Active users
  3. Select More at the top of the screen and then click on Setup Azure multi factor auth
  4.  Find the users you want to enable MFA for  and enable them
Read More →
Replies: 0 / Share:

Connect to Exchange Online PowerShell using MFA Install Error – Deployment and application do not have matching security zones.

When following the steps to install the power Exchange Online Remote PowerShell Module for multi-factor authentication and you get the error that says:

Cannot Start Application

Application cannot be started. Contact the application vendor.

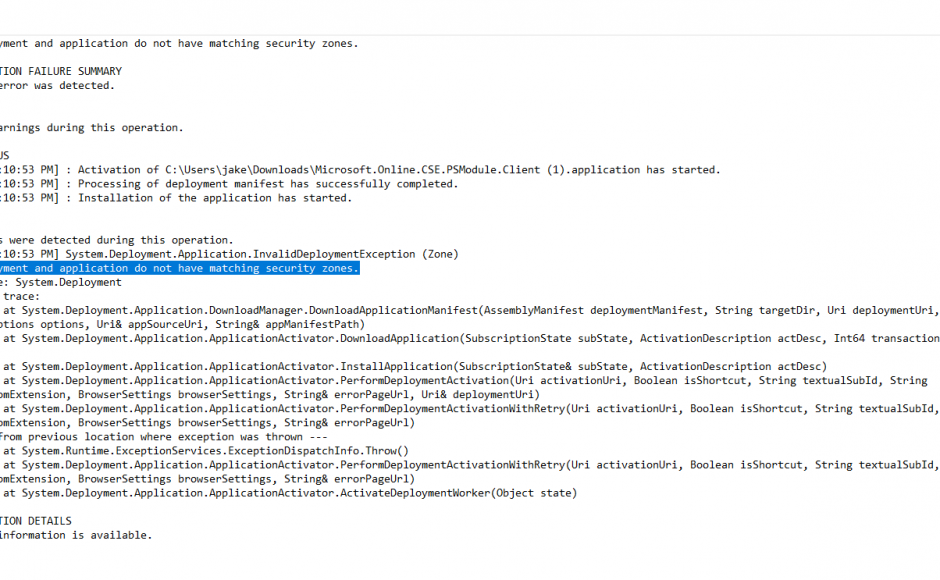
If you hit details you will get a stack trace similar to below:

PLATFORM VERSION INFO
Windows : 10.0.16299.0 (Win32NT)
Common Language Runtime : 4.0.30319.42000
System.Deployment.dll : 4.7.2556.0 built by: NET471REL1
clr.dll : 4.7.2633.0 built by: NET471REL1LAST_C
dfdll.dll : 4.7.2556.0 built by: NET471REL1
dfshim.dll : 10.0.16299.15 (WinBuild.160101.0800)

SOURCES
Deployment url : file:///C:/Users/jake/Downloads/Microsoft.Online.CSE.PSModule.Client%20(1).application

IDENTITIES
Deployment Identity : Microsoft.Online.CSE.PSModule.Client.application, Version=16.0.2186.0, Culture=neutral, PublicKeyToken=a8eee8aa09b0c4a7, processorArchitecture=msil

APPLICATION SUMMARY
* Installable application.
* Trust url parameter is set.
ERROR SUMMARY
Below is a summary of the errors, details of these errors are listed later in the log.
* Activation of C:\Users\jake\Downloads\Microsoft.Online.CSE.PSModule.Client (1).application resulted in exception. Following failure messages were detected:
+ Deployment and application do not have matching security zones.

COMPONENT STORE TRANSACTION FAILURE SUMMARY
No transaction error was detected.

WARNINGS
There were no warnings during this operation.

OPERATION PROGRESS STATUS
* [13/03/2018 8:10:53 PM] : Activation of C:\Users\jake\Downloads\Microsoft.Online.CSE.PSModule.Client (1).application has started.
* [13/03/2018 8:10:53 PM] : Processing of deployment manifest has successfully completed.
* [13/03/2018 8:10:53 PM] : Installation of the application has started.

ERROR DETAILS
Following errors were detected during this operation.
* [13/03/2018 8:10:53 PM] System.Deployment.Application.InvalidDeploymentException (Zone)
– Deployment and application do not have matching security zones.
– Source: System.Deployment
– Stack trace:
at System.Deployment.Application.DownloadManager.DownloadApplicationManifest(AssemblyManifest deploymentManifest, String targetDir, Uri deploymentUri, IDownloadNotification notification, DownloadOptions options, Uri& appSourceUri, String& appManifestPath)
at System.Deployment.Application.ApplicationActivator.DownloadApplication(SubscriptionState subState, ActivationDescription actDesc, Int64 transactionId, TempDirectory& downloadTemp)
at System.Deployment.Application.ApplicationActivator.InstallApplication(SubscriptionState& subState, ActivationDescription actDesc)
at System.Deployment.Application.ApplicationActivator.PerformDeploymentActivation(Uri activationUri, Boolean isShortcut, String textualSubId, String deploymentProviderUrlFromExtension, BrowserSettings browserSettings, String& errorPageUrl, Uri& deploymentUri)
at System.Deployment.Application.ApplicationActivator.PerformDeploymentActivationWithRetry(Uri activationUri, Boolean isShortcut, String textualSubId, String deploymentProviderUrlFromExtension, BrowserSettings browserSettings, String& errorPageUrl)
— End of stack trace from previous location where exception was thrown —
at System.Runtime.ExceptionServices.ExceptionDispatchInfo.Throw()
at System.Deployment.Application.ApplicationActivator.PerformDeploymentActivationWithRetry(Uri activationUri, Boolean isShortcut, String textualSubId, String deploymentProviderUrlFromExtension, BrowserSettings browserSettings, String& errorPageUrl)
at System.Deployment.Application.ApplicationActivator.ActivateDeploymentWorker(Object state)

COMPONENT STORE TRANSACTION DETAILS
No transaction information is available.


How to fix  Exchange Online Remote PowerShell Module for multi-factor authentication installation issue

Download the installer from Office 365 using Internet Explorer, then when you install it works.

Not sure why you have to use IE but that is how it works for me.

Read More →
Replies: 11 / Share:

Azure Files – Azures answer to the on-premise file share

Azure Files is Microsoft’s answer to the typical on premise file server file share.

Using the SMB 3 protocol to connect your computers, laptops and servers to a file “serverless” file share in the cloud.

I have been using Azure Files to connect sites together for large data migrations, where I used to use a VPN, I now just use an file share straight from Azure which has been really easy to manage, just map the network drive and once your done un-map the drive.

I haven’t actually used this in production yet, and I am not sure how it will perform with a lot of users connected but it is an interesting concept. I’m also not sure about how to keep this secure, I need to look into that further because if you have say 30 computers with a mapped network drive and they are all using the same credentials what happens if one of them gets compromised?

Does that then mean that someone has the key to access all of your files? Something that I still need to look into… Either way once I do I will update this post. If anyone reads this and does know I would be interested so leave a comment or touch base with me on LinkedIn or email.

More info on Azure files can be found here:

How to Make an Azure Files File Share

This video shows you how to make a new Storage account, create a file share and connect it to a computer using a mapped network drive. I also show you how to download and install the Azure Storage Explorer and use it to browse your newly created file share.


A Note on Azure Storage Explorer: I did some testing and it turns out you cannot look at your on premise network locations in the program, just (as the name suggests) Azure Storage.

Read More →
Replies: 0 / Share:

How To Recreate Arbitration Mailboxes – Exchange 2016

After recovering from a failed Exchange Server I was getting wierd issues where things weren’t working properly. After some investigation I found that the old mailbox was still showing in EAC.

I tried to delete it and got an error that said:

This mailbox database contains one or more mailboxes, mailbox plans, archive mailboxes, public folder mailboxes arbitration mailboxes, or audit mailboxes. To get a list of all mailboxes in this database, run the command Get-Mailbox -Database . To get a list of all mailbox plans in this database, run the command Get-MailboxPlan. To get a list of archive mailboxes in this database, run the command Get-Mailbox -Database -Archive. To get a list of all public folder mailboxes in this database, run the command Get-Mailbox -Database -PublicFolder. To get a list of all arbitration mailboxes in this database, run the command Get-Mailbox –Database -Arbitration. To get a list of all Audit mailboxes in this database, run the command Get-Mailbox -Database -AuditLog. To disable a non-arbitration mailbox so that you can delete the mailbox database, run the command Disable-Mailbox . To disable an archive mailbox so you can delete the mailbox database, run the command Disable-Mailbox -Archive. To disable a public folder mailbox so that you can delete the mailbox database, run the command Disable-Mailbox -PublicFolder. Audit mailboxes should be moved to another server; to do this, run the command New-MoveRequest . If this is the last server in the organization, run the command Get-Mailbox -AuditLog | Disable-Mailbox. Arbitration mailboxes should be moved to another server; to do this, run the command New-MoveRequest . If this is the last server in the organization, run the command Disable-Mailbox -Arbitration -DisableLastArbitrationMailboxAllowed to disable the arbitration mailbox. Mailbox plans should be moved to another server; to do this, run the command Set-MailboxPlan -Database

Upon further investigation it turns out I couldn’t delete the mailbox because it thought that the arbitration mailboxes still existed on that mailbox database.

If you follow the steps in the video above, you will be shown how to delete the arbitration users and recreate them.

You will need the exchange installation media, which you can download from Microsoft.

Read More →
Replies: 1 / Share:

Azure – Vault Deletion Error – Cannot perform delete operation because the scope is locked

This issue occurs because there has been a lock placed on the Azure resource you are trying to delete.

Azure sometimes places locks on linked resources or you or another administrator of the system may have put a lock on the resource.

What is a resource lock?

Basically the resource locks stop you from acidentily deleting an Azure resource, it i good practice to put resource locks on production Azure resources to protect from accidential deletion & you can also put notes on the lock so who ever is trying to delete it can see why the lock was put on initially.

How to remove Azure Resource lock so you can delete the Azure resource?

Open the resource you want to delete and select Locks – This is in the settings part of the blade.

Read the comment on the Resource Lock to see why it is applied, if it is safe to delete then you can click the three dots on the right of the Lock and click delete.

Now the resource lock is removed from the Azure Resource, you will be able to delete it.

Read More →
Replies: 3 / Share:

How to crack Windows computer with iSeePassword

Hello Folks, how are you all doing? Today we are going to discuss one of the most asked questions in our blog about how to crack Windows computer password? Microsoft has provided amazing security features in Windows operating system where you can setup a text password to lock your computer to keep it away from any uninvited strangers accessing it without your authentication. And with the latest Windows 10, you can even put picture, Microsoft and picture password as your default password type.

Let us talk about a little about text, picture, Microsoft and PIN password so that you can understand their significances.

Text Password – Most commonly used to password-protect computers. You can setup any text words as your password to protect your computer.

PIN Password – Allows you to setup a 6 digit PIN password to protect your computer. PIN passwords are usually not secured but yet they are amazing to lock your computer and in addition, PINs are easy to remember.

Microsoft Account – This is new and introduced with Windows 8 and Windows 10 where you can totally change the default account type to Microsoft account and enter your Microsoft email and password to access your PC. This is an astonishing way to protect your computer and move your settings with Microsoft account if you buy a new Windows computer.

Picture Password – This is one of the most secure ways to protect your computer where you select a picture from your library and enter 3 random gestures to protect your computer. You can either draw a pattern or resize a portion and you will have to exactly draw the same gestures again to access your PC.

Alright, so now that you know all about text, PIN, Microsoft and Picture password, let’s discuss what to do if you forget the password of your own computer or what if you bought a used computer which is password-protected. Well, first of all, do not panic and do something dumb like formatting your computer because that will cause heavy data damage and will probably erase everything on your computer.

In this tutorial, we will introduce you to a truly charming Windows password recovery tool to completely remove all kinds of password from your computer. iSeePassword – Windows Password Recovery Pro is a remarkable and effective password reset tool that can not only reset the password of your computer but it can totally bypass the login screen. In brief, it will help you to create a password reset disk in 2 ways with your CD/DVD or flash drive and then, you can use that password reset disk to remove the password from your main computer.

It is extremely easy to go program with endless features that you can’t ignore. Let us highlight the benefits of using iSeePassword – Windows Password Recovery Pro so that you can see the true potential of this software.

Benefits of iSeePassword – Windows Password Recovery Pro

  • Reset and remove password from any Windows computer including Windows XP/Vista/95/98/2000 as well as the latest Windows 7/8/10.
  • Destroy all four kinds of passwords from Windows PC – PIN, picture, Microsoft and Text Password.
  • Works with all types of accounts such as administrator, Microsoft, root and domain profiles.
  • Create a password reset disk in 2 comfortable ways with your flash drive and CD/DVD.
  • Compatible with all Windows computer and laptop brands like Sony, Acer, HP, Lenovo, Dell, Acer, etc.
  • Works with all hard drive types such as IDE, SATA, HDD, and SSD and so on.
  • Lifetime free upgrades and free support.

Tutorial on how to crack Windows computer with iSeePassword –

Preparations required

  • An accessible Windows computer or laptop.
  • An empty flash drive or writable CD/DVD.
  • iSeePassword program.
  • Around 20 minutes of your life.

Step by step Guide

Step 1. Install iSeePassword on the accessible Windows system and insert a flash drive or CD/DVD on your PC. Launch the program and wait for the program to identify it automatically.

Step 2. Select the name of your device and click on “Burn USB” and if you are using CD/DVD then simply click on “Burn CD/DVD” to create the password reset disk.

Step 3. Plug in the password-reset disk on your password-protected PC and reboot it from your USB flash drive or CD/DVD. The program will be activated automatically on your home screen and you only need to do the following after that:

  • Choose the Windows version i.e. Windows 10.
  • Select the targeted locked user.
  • Click “Reset password”
  • Reboot

SUCCESS! You may already realize the password is completely removed from your PC now.

Forgetting Windows computer password is no fun especially when you need to use it urgently or if you have important data contained inside your computer. But thankfully, iSeePassword – Windows Password Recovery does a tremendous job to crack password from Windows PC and saves us from huge embarrassing moments. It is trusted by millions of customers and already featured on major magazine websites.

Read More →
Replies: 0 / Share:

This video shows you how to allow Skype for Business users to both contact people on other Skype for business domains and also allow users to communicate with normal Skype users.

They can use Skype for both IM and normal voice/video chat.

This video is made using a demo tenant on Office 365.

To allow external communication follow these steps:

  • Log into Office 365 and go to the Skype for Business Admin Centre
  • Click on the “Organisation” tab on the left hand side
  • Click on External Communication
  • Select “Let people use skype for business to communicate with people outside of this organisation”
  • Save the settings
Read More →
Replies: 0 / Share: