Sharing users calendars is one of the most used parts of an Exchange Server(which is included in most of the business versions of Office 365), this feature allows others inside of your organisation to view or edit calendars.

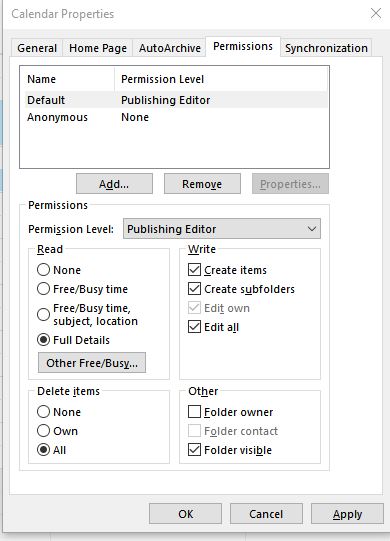
The old school way of doing this was to go around to each user and set the permissions directly on the calendar by right clicking on it and selecting properties, then navigating to the permissions tab where you could set the permissions for each user or group over the calendar.

You can manually view your calendar permissions in outlook by right clicking on your calendar and selecting properties then going to the permissions tab.
You can manually view your calendar permissions in outlook by right clicking on your calendar and selecting properties then going to the permissions tab. This is useful if you want to share a single calendar but if you want to edit bulk calendars then PowerShell is the way to go.

But there is a better way. We can use PowerShell to set these permissions in bulk on either exchange or office 365.


So what are the different exchange calendar permission levels?

Straight out of the box calendars come with a bunch of preset permission levels, this makes your life easier because you can allow a bunch of different controls over the calendars from not being able to see them or being able to set users to be able to book meetings and delete meetings if needed. The different permission levels are as follows:

  • None – FolderVisible
  • Owner – CreateItems, ReadItems, CreateSubfolders, FolderOwner, FolderContact, FolderVisible, EditOwnedItems, EditAllItems, DeleteOwnedItems, DeleteAllItems
  • PublishingEditor – CreateItems, ReadItems, CreateSubfolders, FolderVisible, EditOwnedItems, EditAllItems, DeleteOwnedItems, DeleteAllItems
  • Editor – CreateItems, ReadItems, FolderVisible, EditOwnedItems, EditAllItems, DeleteOwnedItems, DeleteAllItems
  • PublishingAuthor – CreateItems, ReadItems, CreateSubfolders, FolderVisible, EditOwnedItems, DeleteOwnedItems
  • Author – CreateItems, ReadItems, FolderVisible, EditOwnedItems, DeleteOwnedItems
  • NonEditingAuthor – CreateItems, ReadItems, FolderVisible
  • Reviewer – ReadItems, FolderVisible
  • Contributor – CreateItems, FolderVisible

What are the PowerShell commands used to manipulate calendar permissions?

The basic PowerShell commands you can use to edit the permissions of calendars are(each one has a link to the official Microsoft documentation):

Notice that all of the commands are to do with MailboxFolderPermission, this is because Exchange actually treats the calendar as a folder, so whatever we are doing to the calendar we are actually doing to an exchange folder.

Using PowerShell to Edit Calendar Permissions

So now lets get into it, if you are using Microsoft Exchange installed on your server then you can just open the Exchange PowerShell application, if you are using Office 365 you will need to first connect to office 365 in PowerShell, you can follow the instructions in that article to connect.

Once you are connected to exchange in PowerShell it is time to run some commands.

Getting a users calendar permissions

To get a users calendar permissions we will use the Get-MailboxFolderPermission command in PowerShell.

Get-MailboxFolderPermission -Identity [email protected]:\Calendar -User [email protected]


Some final notes and recommendations with folder sharing in office 365

  • When setting permissions it is best not to set owner permissions for the calendars as this will allow other users to delete the calendar on someone else’s mailbox. This could lead to a real headache as the users calendar will just disappear and they wont know why.
  • Setting PublishingEditor permission will allow users to have all permissions except to delete the actual calendar.
  • Setting default sharing is usually a pretty handy thing in smaller businesses that are using the service. This will allow for more collaboration and a more open workplace.
Read More →
Replies: 0 / Share:

As you might know with the release of Windows 10 Microsoft gave the ability to join your computer to Azure Active Directory to manage the devices from the cloud.

The main benefit to connecting your computer to Azure AD is that you get Single Sign On(SSO) to all of your Office 365 apps and as Office 365 uses Azure AD for to store all of its user information if you have Office 365 you have Azure AD.

To enroll your device into Azure AD follow these steps

Open the settings

Windows settings

From the settings app open the System settings

System settings azure ad

Select the about tab and click the Join Azure AD button

join azure ad domain

Type in your Azure AD Credentials and hit the sign in button

type in your azure ad credentials
Once you have finished joining AD on Azure then you will need to restart the computer and log in using the Azure AD credentials.
Now you are enrolled into your organisation.


Read More →
Replies: 0 / Share:

Wipe Phone or Tablet From Office 365 Business or Enterprise

A good feature of Office 365 is that you can actually wipe a mobile device from it. This can be quite useful if a phone or tablet has been stolen or lost and you do not want people to access your enterprise data.

Microsoft Exchange Server also has this same feature and it is the same process in exchange to do this.

You can only clear the data from a device if it was set up to use Exchange ActiveSync. If the device was not setup with activesync then this will not work.

What you will need to do is:

  • login as the administrator to your office 365 portal.
  • Then navigate to the ADMIN section on the left hand side and select Exchange. This will then redirect you to the Exchange section of Office 365.
  • Inside the Exchange you will need to go to the recipients tab and select mailboxes(Mailboxes should be selected first anyway)
  • Then find the user that you want to wipe the mobile device for and select them
  • In the right hand side there will be a section saying mobile devices, click on that
  • Now it should have all the mobile devices that are associated
  • Select the mobile device that is lost or stolen
  • Up the top of the window you will be able to select wipe
Read More →
Replies: 0 / Share:

OST cannot be accessed because it is configured for a different mailbox error

ost file cannot be accessed because it has been configured for use with a different mailbox

I got this error after moving someone from a local Exchange 2003 server to Office 365.

When you open outlook you will get a message saying:

The file C:\Users\<username>\Local\Microsoft\Outlook\<emailaddress>.ost cannot be accessed because it has been configured for use with a different mailbox. 

From what I can figure out it is because it another exchange account with the same name but different credentials and on a different server but still using the same profile so outlook tries to use the same OST file.

How to fix the OST cannot be accessed error

To fix this issue what you need to do is configure a different email profile. To do this follow these steps:

  • Open Control Panel
  • Select Mail
  • Select Profiles
  • Add a new profile
  • Give the profile a name and hit OK
  • Then connect your email account using the correct credentials

Now when you open Outlook it should sync up with Exchange or Office 365.

Read More →
Replies: 4 / Share: