Export a list of Office 365 users, their licenses and MFA Status in all customer tenants with delegated administration

Here’s a script that I have been using to get all users with their MFA Status & what licenses they have been allocated.

I modified the script from Elliot Munro GCITS for exporting a list of users licenses to include the MFA status, the orignal script is available here.

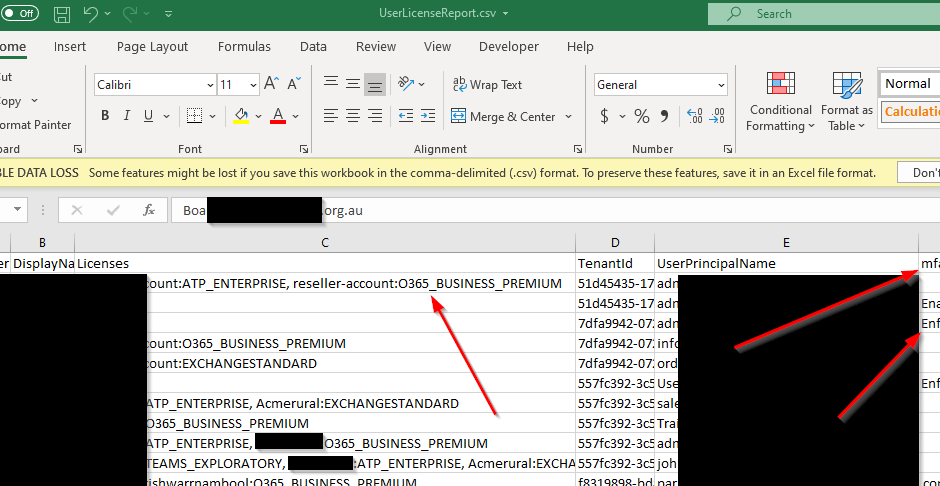
You will get the output of the CSV like this, I usually use it in excel and format as a table, then filter from there.

Output of the CSV file

How to Export all office 365 Users to the CSV

  1. Copy and paste the code into PowerShell ISE
  2. Save it as a .ps1 file
  3. Run the script
  4. Enter your account credentials that has deligated admin permissions
  5. Leave the script to run
  6. See all users and their MFA status along with their licence allocations at C:\Temp\UserLicenseReport.csv

The Script

$customers = Get-MsolPartnerContract -All
Write-Host "Found $($customers.Count) customers for $((Get-MsolCompanyInformation).displayname)." -ForegroundColor DarkGreen
$CSVpath = "C:\Temp\UserLicenseReport.csv"
  
foreach ($customer in $customers) {
    Write-Host "Retrieving license info for $($customer.name)" -ForegroundColor Green
    $licensedUsers = Get-MsolUser -TenantId $customer.TenantId -All | Where-Object {$_.islicensed}
  
    foreach ($user in $licensedUsers) {
        Write-Host "$($user.displayname)" -ForegroundColor Yellow  
        $licenses = $user.Licenses
        $licenseArray = $licenses | foreach-Object {$_.AccountSkuId}
        $licenseString = $licenseArray -join ", "
        Write-Host "$($user.displayname) has $licenseString and MFA: "  -ForegroundColor Blue
		Write-Host "$user.StrongAuthenticationRequirements.State "
        $licensedSharedMailboxProperties = [pscustomobject][ordered]@{
            CustomerName      = $customer.Name
            DisplayName       = $user.DisplayName
            Licenses          = $licenseString
            TenantId          = $customer.TenantId
            UserPrincipalName = $user.UserPrincipalName
	    MFAStatus		  = $user.StrongAuthenticationRequirements.State 
        }
        $licensedSharedMailboxProperties | Export-CSV -Path $CSVpath -Append -NoTypeInformation   
    }
}

MFA Status’s??

If your unsure about what the different states for MFA Status they are available here: https://docs.microsoft.com/en-us/azure/active-directory/authentication/howto-mfa-userstates

Read More →
Replies: 0 / Share:

So basically people sometimes call & say something about not receiving an email from someone or they think that emails are getting blocked by spam.

So wrote a small script that will connect to Exchange Online & then prompt for the amount of days back you want to check for spam and also which user. 

The script then exports it to a CSV file & opens it for you so you can view it.


#You need the ExchangeOnlineManagmenet module installed in powershell 
#Install-Module -Name ExchangeOnlineManagement


#Import exchange
Import-Module ExchangeOnlineManagement
Connect-ExchangeOnline

#set todays date and the amount of time to seach back
$today = Get-Date
$DaysBack = Read-Host -Prompt 'Input the days you want to go back'

#set the amount of days you want to go back 
$yesterday = (get-date).AddDays(-$DaysBack) 

# set who's mailbox you want to check
$recipient = Read-Host -Prompt 'Enter users email'

#mark status you want to search for
$Status = "FilteredAsSpam" 


Get-MessageTrace -StartDate $yesterday -EndDate $today -RecipientAddress $recipient -Status $Status | Select MessageID,Received,*Address,*IP,Subject,Status,Size | Format-Table

Invoke-Item C:\Temp\SpamResults.csv
Read More →
Replies: 0 / Share:

Vault cannot be deleted as there are existing resources within the vault – Azure

If you get the following error:

Error Description: Vault cannot be deleted as there are existing resources within the vault. : xxxx.xxxxx.xxxxx Unregister all containers from the vault and then retry to delete vault. For instructions, see https://aka.ms/AB-AA4ecq5 Code: ServiceResourceNotEmptyWithContainerDetails
To make it so you can delete the Recovery Services Vault. Open the Storage Accounts under “Backup Infrastructure” by navigating to, Recovery Vault >- Backup Infrastructure -> Storage Accounts
Then hit the three dots & select delete. Now you will be able to delete the vault that you were trying to delete.


Read More →
Replies: 0 / Share:

A common data breach method that I have seen on emails is leveraging client forwarding rules to forward every email received to a third party.

Basically a “hacker” will gain access into a mailbox (usually through social engineering) and then setup forwarding rules on the mailbox so all of the emails will be received by the intended recipient as well as forwarding the email to the malicious third party.

This risk can be mitigated by disabling client forwarding rules to external domains. This means that your email server will not allow auto-forwarding of emails to domains that are not part of your organisation.

How to disable client forwarding rules to external domains in office 365 or Exchange Server

If you have an enterprise SKU of Office 365 you can use the secure score function to automatically create the rule, just go to https://securescore.office.com/ and enable Client Forwarding Rules Block.

Manually setting a rule to block autoforwarding

If you do not have an enterprise SKU on office 365 (or if you have an on premise exchange server) you will need to manually create the mail flow rule to block auto forward emails.

You will need to go to the exchange admin center an under rules select new rule & then follow the video above that has the instructions on setting up the rule.


Some other useful informaiton around securing your email environment:

How to Setup Outbound Spam notifications on Office 365 or Exchange

Setup MFA on Office 365


Read More →
Replies: 0 / Share:

How to Setup Outbound Spam notifications on Office 365 or Exchange

It is good practice to monitor outbound spam, if a computer gets infected with a virus or your exchange passwords are compromised the attacker can use your exchange or office 365 mailbox to send out spam.

Once this is setup if the server detects and blocks outbound spam it will send a notification email to you (or the admin) then you can investigate why this is happening.

The setup process is basically the same in both office 365 or Exchange on Premis.

How to setup the outbound spam notifications

  • Go to EAC
  • Open Protection
  • Click outbound spam
  • Open the default policy (or any other policy)
  • Select Outbound spam preferences
  • Tick the Send notification to the following email address or addresses when a sender is blocked for sending outbound spam.
  • Enter the email you want the notification to go to.

Now if any of your mailboxes are sending out spam you will know about it!!

Read More →
Replies: 0 / Share:

How to setup Multi Factor Authentication in Office 365 – Two Factor Authentication

What is Multi Factor Authentication?

Multi-factor authentication (MFA) is a security system that requires more than one method of authentication from independent categories of credentials to verify the user’s identity for a login or other transaction.

In Office 365 the way MFA works is that you use your normal username & password but after you have verified that factor of authentication you are then sent a text message (SMS Message) to your mobile phone with a code to enter into the login screen.

This increases security because if someone does find out your username & password they still cannot login to your account without your mobile phone.


Setting up MFA on Office 365

You will need to be an administrator of your office 365 tenant to set this up.

MFA is a free service that you get with Office 365. At the very least you should have MFA enabled on all administrative users and if you can you should have it enabled on all Office 365 user accounts.

  1.  Log into the Office 365 admin center
  2. Go to Users > Active users
  3. Select More at the top of the screen and then click on Setup Azure multi factor auth
  4.  Find the users you want to enable MFA for  and enable them
Read More →
Replies: 0 / Share:

Azure Files – Azures answer to the on-premise file share

Azure Files is Microsoft’s answer to the typical on premise file server file share.

Using the SMB 3 protocol to connect your computers, laptops and servers to a file “serverless” file share in the cloud.

I have been using Azure Files to connect sites together for large data migrations, where I used to use a VPN, I now just use an file share straight from Azure which has been really easy to manage, just map the network drive and once your done un-map the drive.

I haven’t actually used this in production yet, and I am not sure how it will perform with a lot of users connected but it is an interesting concept. I’m also not sure about how to keep this secure, I need to look into that further because if you have say 30 computers with a mapped network drive and they are all using the same credentials what happens if one of them gets compromised?

Does that then mean that someone has the key to access all of your files? Something that I still need to look into… Either way once I do I will update this post. If anyone reads this and does know I would be interested so leave a comment or touch base with me on LinkedIn or email.

More info on Azure files can be found here:

How to Make an Azure Files File Share

This video shows you how to make a new Storage account, create a file share and connect it to a computer using a mapped network drive. I also show you how to download and install the Azure Storage Explorer and use it to browse your newly created file share.


A Note on Azure Storage Explorer: I did some testing and it turns out you cannot look at your on premise network locations in the program, just (as the name suggests) Azure Storage.

Read More →
Replies: 0 / Share:

Azure – Vault Deletion Error – Cannot perform delete operation because the scope is locked

This issue occurs because there has been a lock placed on the Azure resource you are trying to delete.

Azure sometimes places locks on linked resources or you or another administrator of the system may have put a lock on the resource.

What is a resource lock?

Basically the resource locks stop you from acidentily deleting an Azure resource, it i good practice to put resource locks on production Azure resources to protect from accidential deletion & you can also put notes on the lock so who ever is trying to delete it can see why the lock was put on initially.

How to remove Azure Resource lock so you can delete the Azure resource?

Open the resource you want to delete and select Locks – This is in the settings part of the blade.

Read the comment on the Resource Lock to see why it is applied, if it is safe to delete then you can click the three dots on the right of the Lock and click delete.

Now the resource lock is removed from the Azure Resource, you will be able to delete it.

Read More →
Replies: 3 / Share: